
By Allison Cottreau - images & text © 2000
|
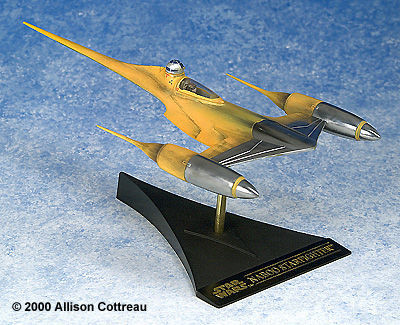 According to Starwars.com, the Naboo Royal N-1 Starfighter was created for the purpose of planetary defense sorties, patrols, and formal diplomatic escort missions. This handcrafted space fighter embodies the Naboo love of elegant design, and includes all the necessary equipment within a custom-designed spaceframe, making the ship a work of art. |
|
Click on any picture to see a larger view.
|
In accordance with the Naboo philosophy of harmony, the engines were modified for cleaner operation, which results in fewer atmospheric emissions during launch and landing cycles. I must admit when I first saw this fighter on screen it wasn't love at first sight, but the more I saw it, the more it grew on me. The same goes for the model kit, the first thing I noticed was the small size of the box and then I saw those big yellow letters "SNAPFAST" and pretty much disregarded it. Of course I eventually got past those two shortcomings, the deciding factor was the half price sticker on the front of the box. At 7 bucks Canadian it's hard to go wrong I guess. Preparation and AssemblyAfter getting it home and washing the parts, the first thing I did was strip the chrome platting from the parts that had it using Easy-Off oven cleaner. I decided this model would make an excellent candidate for Testors Buffable Metalizer. I had never tried this product before and was anxious to see the results, so I worked on the front end assembly and belly first. To prepare the snap parts for gluing I used an exacto knife to shave down the pegs. I did this so I'd be able to pull it apart again after test fitting the various assemblies. Everything fit together fine, so I carried on with glue and putty, though not much putty was required on my kit. The spot that required the most putty was the joint between wing/engine section and the main fuselage. On the model pictured on the side of the box you can see it quite plainly, yet this joint does not exist on the studio model on the front of the box. Probably the two trickiest spots I had with this kit were the R2 Unit and the swept back engine tips. I had a little trouble with cleaning up the joint between the two halves of R2-D2 dome without removing the detail. As far as the engines go I should have assembled the back half of the engine and built the main engine assembly around it. Instead I prematurely glued the main engine assembly together. Once that was done I had to remove the ridge on the front of the rear engine half (parts 5, 6 & 7) that fits into the groove inside of parts 4 & 2 to get it where it needed to be. Everything else went together without a hitch. PaintingI paint all my models with Tamiya acrylics and as I said earlier I was excited to try Testors Model Master Metalizers on this subject. I received a lot of good information about metalizers by modelers on the Starship Modeler discussion board and followed most of it to very satisfying results. One of those tidbits was to prime the model to give an even colored basecoat because if you don't, the puttied and bare plastic sections will reflect differently. So, once I had everything all smoothed out I painted the front end and under belly gloss white to prepare it for the Metalizer. I chose Stainless Steel as the colour to go with and after taking all necessary safety precautions (gloves, mask) I spayed it. When it first dried it looked like any other metallic paint, a dull pseudo-metal finish, I then began to buff it by hand and was less than amazed by the result. It looked like pewter more than the polished steel, which did look nice but it was not what I was aiming for. So going against the advice I was told I decided to try using the Dremel power tool and a felt wheel, BIG MISTAKE. It buffed it up really well but if left on one spot for more then half a second (on the lowest speed) it burned through the paint into the plastic. Now back to square one, I stripped the paint and fixed the new blemishes and tried again. After I repainted the pieces I buffed it once more, this time I used the cotton polishing wheel as I was recommended to in the first place. The results were very impressive indeed. But let's not forget about the rest of the craft. For the yellow I used a mixture of Tamiya acrylics. I used yellow, with some flat white mixed in to soften it and a few drops of red to give it more of a golden yellow instead of a bright yellow. Once I was happy with this colour I applied it to the main fuselage and set it aside. |
|
I painted R2-D2 next I started with flat aluminum. Once it had dried I painted his panels with dark blue, and some of his other details, like his "eye" in black. I was a little disappointed by the pilot, I would have rather had a Naboo pilot than Anakin. I even considered modifying him but instead I just used the figure as it came and painted him more or less as the instruction sheet stated. I painted the helmet according to reference images, choosing Hull Red as the colour. I also applied a wash along with drybrushing to bring out the details. DecalsThis model came with all of 12 tiny decals, and with a little help from some setting solution went on beautifully. Weathering
I decided not to seal my model with a clearcoat because that usually darkens the pastel weathering, and I felt mine was dark enough and the clearcoat would just make it way too dark. DisplayI liked the base that came with the kit but not the clear piece that joined it to the model, so I filled the groove in which the clear piece sits with putty and drilled a hole in the middle of the base for the piece of brass tubing I'd cut to support the model. The base came with shiny smooth sides and a flat textured top. I liked it and painted it in a similar fashion, using flat black on top and gloss black on the sides. I finished it off by trimming the lettering in gold. ConclusionOverall I enjoyed this kit. I think ERTL succeeded in producing a good kit that makes a great introduction to young modelers. It is simple and the parts snap together well and securely, but the fact that it's a snap kit and makes a great beginners kit shouldn't discourage the more experienced modeler. With a little bit of work you can make a fine addition to your Star Wars collection. On the down side it is a bit small and there is not a whole lot of detail. On the plus side you can pick this kit up on sale almost anywhere so it's cheap, even full price it's not a bad deal, and it can be put together in a couple of evenings. Bottom line: if you like the ship, this kit is well worth picking up. |
![]()
This page copyright © 2000 Starship Modeler™. Last updated on 16 May 2000.
![[Sidw View]](ac_naboo/ac_Naboo2.jpg)
![[Head on]](ac_naboo/ac_Naboo3.jpg)
![[Left side]](ac_naboo/ac_Naboo4.jpg)
![[Bottom]](ac_naboo/ac_Naboo5.jpg)
![[Top]](ac_naboo/ac_Naboo6.jpg)
![[Buffing]](ac_naboo/ac_naboo_B&ABuff.jpg) At first I was not planning on weathering this kit. I thought that Naboo were a pretty clean bunch and that a royal escort would be kept spotless as well. But looking at the image of the studio model on the front of the box and images from the movie it looked to be a pretty well-used little ship. In the end I decided to weather it. For the most part I used ground pastels. I apply them with Q-tips and old brushes, but for the trails of soot behind the laser cannons I airbrushed flat black. I positioned the airbrush in front of the lasers and pointed it to the rear, keeping it line up with the lasers. I carefully and slowly sprayed a little bit so as not to create little pools of paint. This technique left more black then I wanted so after the black dried I touched up the edges with the base yellow to tone it down. The reason I used the airbrush instead of pastels on the lasers was because pastels will not stick to the smooth metalizer. I had to use the same technique on the torpedo launcher on the underside of the craft.
At first I was not planning on weathering this kit. I thought that Naboo were a pretty clean bunch and that a royal escort would be kept spotless as well. But looking at the image of the studio model on the front of the box and images from the movie it looked to be a pretty well-used little ship. In the end I decided to weather it. For the most part I used ground pastels. I apply them with Q-tips and old brushes, but for the trails of soot behind the laser cannons I airbrushed flat black. I positioned the airbrush in front of the lasers and pointed it to the rear, keeping it line up with the lasers. I carefully and slowly sprayed a little bit so as not to create little pools of paint. This technique left more black then I wanted so after the black dried I touched up the edges with the base yellow to tone it down. The reason I used the airbrush instead of pastels on the lasers was because pastels will not stick to the smooth metalizer. I had to use the same technique on the torpedo launcher on the underside of the craft.