
By Larry Strickland - images & text © 2004
|
![[Click to enlarge]](ls_car-010s.jpg) First Impressions I was a little disappointed by the lack of detail and accuracy of this kit. But then I reminded myself that this is a snap kit (Skill Level 1). This kit was made for ages 8 to adult. With this in mind, I decided to not be so detail oriented with the kit and have a little fun with it. |
|
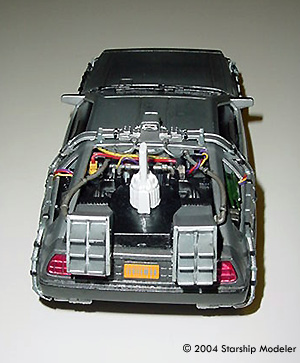
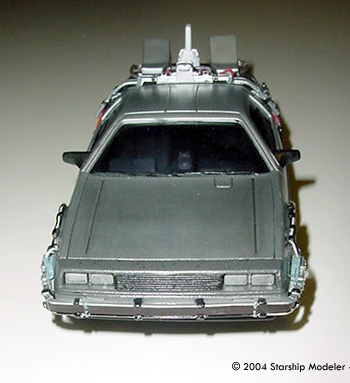
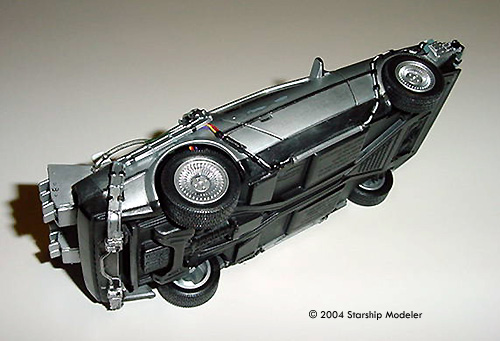
Image: Rear view Image: Front view Image: Added detail Image: Right side & underneath |
Research As usual, my first task before beginning any model was to gather as many references as possible. The photos I found on the internet were very helpful with giving ideas for adding some extra detail to this kit, and to help with colors for painting. The best reference shots I was able to find were of the effect miniature. I found these on the Starship Modeler web site. Construction After looking over the kit parts and instructions, and comparing them to what references I could find, I decided to try to fix at least a few of the inaccuracies I found when comparing the model to photos of the full size vehicle used in the movies. Here is a list of simple improvements to a very simple kit. Problems and Solutions Problem: The cables that run along the sides of the vehicle are molded right on the vehicle body. It did not look to scale, and made the model look more like a toy. Solution: I used my trusty Dremel tool to remove the cables, and then made my own cables using solder wire that looked more in scale. This proved to work very well, the hardest part was deciding what color to paint the cables. In the reference photos I could find, the cables are always slightly different depending on which movie or car was used in the photo. I finally just went as simple as possible, going with two black, and one white cable. As for the ties that hold the three cables together, I used Tamiya Tape cut to size and then wrapped around the cables. Once applied, each individual tie was hand painted black. When cables were finished, I used super glue to attach them to the sides of the car body. Problem: The body of the car comes pre-painted (electroplated) in a very bright/shiny aluminum color, which did not seem to match the reference pictures. References show the Delorean used in the moview to be more of a flat, brushed aluminum. Since the paint was electroplated on to the body of the vehicle, I was unable to get it off. I tried using 220 sand paper, bleach, Pine-Sol - without making a dent. Solution: Instead of trying to remove the paint, I took a different approach. I just used Krylon Sandible Primer in two light coats to cover the surface of the body. I then airbrushed on two light coats of flat aluminum. This provided a much better look to the model. Problem: The equipment bay at the back of the vehicle (where the antenna or Mr. Fusion goes) looked way too simple. In the reference photos, this area looked much more busy, with assorted cables, greeblies, batteries, etc. |
|
Solution: I went to my trusty spare parts box. I added several small greeblies and solder wire. When the painting was completed, a fine black oil wash was added to bring out the detail of the parts. Mission accomplished: one very high tech, detailed equipment bay. Painting The instructions are fairly specific, giving a list of 12 ōoptionalö painting colors. I pretty much followed the directions as far as painting goes. It was difficult to get too specific with the colors for the interior and time equipment bay. As I mentioned earlier, the colors and small details appear to magically change depending on what movie you are watching, and if you are looking at the full sized or miniature vehicle. Conclusions For the money, this is a great little kit. Since it is a snap kit, it goes together very easily. This kit is almost entirely a painting subject, and was completed in approximately 25 hours. This was primarily due to the detail work done on the cables, details added to the time equipment bay, and the detail painting required. The main negatives about this kit are: electroplated body color, molded on cables, and lack of detail in certain areas of the vehicle. Positives include: very inexpensive, easy to find, quick build up, and fairly easy to add detail to increase accuracy. As you can see, the positives definitely outweigh the negatives. I would highly recommend this kit to anyone who is interested in the subject matter, or if you would like a simple, easy to complete project. This would also be a great kit to do with a beginner. It goes together easily and looks pretty cool once completed. |
![]()
This page copyright © 2004 Starship Modeler™. First posted on 23 August 2004.
![[Click to enlarge]](ls_car_005s.jpg)
![[Click to enlarge]](ls_car-008s.jpg)
![[Click to enlarge]](ls_car-014s.jpg)
![[Click to enlarge]](ls_car-012s.jpg)