
|
By Jonathan Yogore - images & text © 2008
|
 In the original Captain Scarlet and the Mysterons TV series, the Supersonic Passenger Jet, or SPJ, was used to transport Spectrum agents and their equipment over long distances. Crewed by a pilot and co-pilot, the SPJ could transport up to seven passengers at speeds of over 1,500 miles per hour. With fewer passengers on board, the passenger compartment could be fitted out into a conference room. |
|
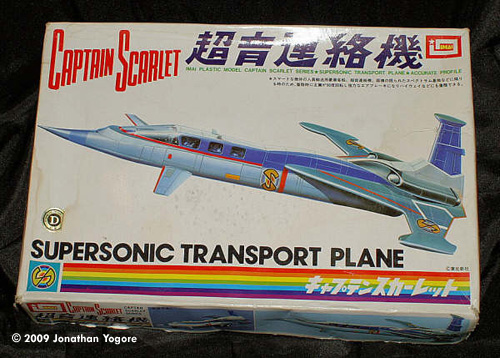
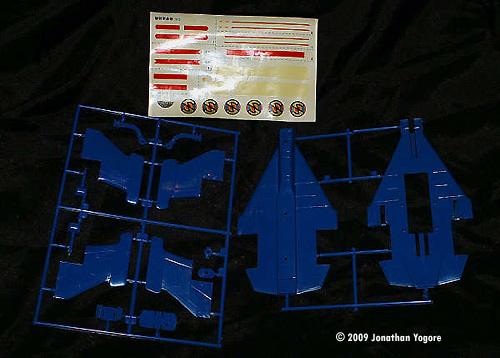
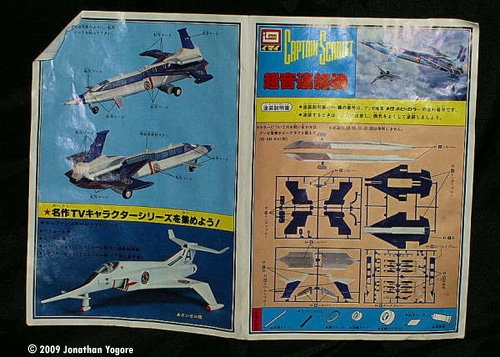
Image: My kit's box is rather "weathered".... Image: The rest of the parts, plus decal sheet Image: Instructions seem clear enough, even though all text is in Japanese Image: Decal placement side |
IMAI's kit has been around forever through several re-issues, but as of this writing is out of production. I got mine for $9 shipped through an online auction house. What You Get My box is well worn but parts were all still sealed in plastic and still on the sprues (all intact except for the nose probe, one side/half broke off the left fuselage piece). Scale unknown, no indication on the box or instructions both 99.9% of which are in Japanese. The measure length base on the fuselage halves is 12 inches, estimated wing tip to wing tip width is 5 inches. Inside the box are 93 styrene parts (molded in blue, white, and clear), 6 small metal coil springs, 3 rubber tires, a 2 inch long brass rod, one small rubber band, one, and a tube of (what I'm assuming is) model cement. One sheet of two sided instructions with assembly instructions on one side and parts inventory and colored photo of a finished model on the other. One sheet of waterslide decals. The instructions are all in Japanese but the following the numbers watching which way the arrows point on the diagrams should suffice. Nothing seems too complicated. Of interest, based on the diagrams Step 9 seems to show that the (one) missile under each wing can be “fired” (which explains the springs I noticed when I first inspected the bag of bits). Step 9 also shows that the kit can also be built with an eject mechanism for the cockpit and passenger compartment (it involves the rubber band in the inventory). A close look at the photo of the finished model seems to show that the activation button for the ejection crew and passenger compartment mechanism is disguised as an external antenna. |
|
It appears the nose wheel can be installed to be retracted but the main gears can not. The decal placement guide uses a photo of a completed model which also, I believe, is intended to be used as a painting guide. Nothing on the decal guide remotely resembles a paint color list. There is an instrument panel decal. The picture of the (I'm assuming) completed kit does not, initially, seem to share the same proportions of the parts in the kit. The model in the picture looks “stubbier”while the kit parts look more like the box art showing a long sleek fuselage. That's what attracted me to the kit in the first place. But I guess the build will tell. The Parts I was pleasantly surprised that the panel lines on this kit were engraved. The engraving seems to be too deep and definitely too wide however, if translated to full size you could probably stick your leg thru the seams. The plastic it thick and the fuselage halves even have bulkheads and bracing. There are locator and positioning pins between section halves but while the parts' thickness is generous the pins are small. The passenger seats are rudimentary. There are no co-pilot or passenger figures and only half a pilot is provided (the upper half). There are two sink holes I noticed one on each side of the passenger compartment halves, should be easily remedied. There is some flash on the openings for the missile pylons in each wing. Otherwise the parts appear to be well molded. Of note is a very faint engraved circle on each wing where the round insignia decals are supposed to go, assuring uniform placement. Decisions ... Decisions... I'll have to put some thought first into deciding whether or not to keep the novelty of the firing missiles and ejection mechanism of the crew and passenger compartment. That decision will be made during the test fitting session to see how well the compartment blends into the fuselage without putty work. Actually using the ejection feature however would be another thing entirely. Not after all the prep and paint work that will be put into it. Next would be deciding to build the kit with the landing gear up or down. Not knowing what the plane looked like on the show I don't know if the belly pod that holds the main landing gear stays down or not. The belly pod as I'm calling is visible in the shots of the white fuselage halves, the instructions show sticking the brass rod thru the pod halves and using it as an axle. The box art shows a clean under belly (with no visible pod). I guess scratch building a more realistic main gear and gear wells is possible, but since the gear has to go in (and out) of the fuselage then an F-16 type landing gear would work. Conclusion I have to admit I'm more of a Thunderbirds guy and am a fan more than an expert really. So I have even less of a frame of reference to this kit's accuracy when compared to the vehicle in the Captain Scarlet series. I've recently started working on recapturing my childhood by getting back to modeling kits of the era and at the same time exposing my son to modeling and at the same time sharing my past. I sort of stumbled onto to this kit because I missed out on the IMAI Thunderbird 2 kit. This kit provides a range of possibilities, always good in a model kit. Your choices range from keeping the novelty of the firing missiles and ejecting cabin to building it as it to adding realistic features like main landing gear and corresponding wells. You can keep the panel lines as it or use it as another exercise in re-scribing a kit. Which ever way you go it's bound to be fun. And that's the point isn't it? Many thanks to Jon's wallet for providing the review sample. Manufacturers and retailers, interested in getting your wares reviewed and publicized on a site averaging 6000+ readers a day? Contact us! |
![]()
This page copyright © 2009 Starship Modeler™. First posted on 22 April 2009.
![[Please click to enlarge]](jy_sst_PICT0488B.jpg)
![[Please click to enlarge]](jy_sst_PICT0498B.jpg)