
By Jim James - images & text © 2000
|
|
|
|
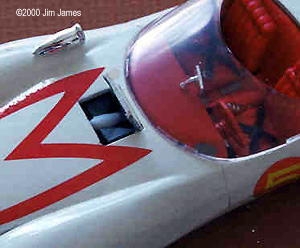
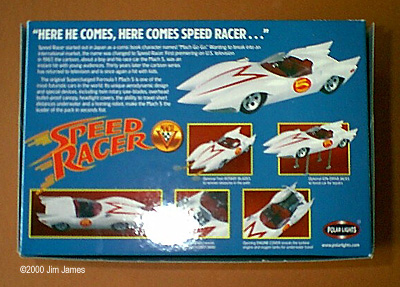
This is a really nice molding from Polar Lights. The styrene is high quality and there's a nice attention to detail. And it's 1/25th so it will go along side the many other cars of the same scale. If you're a skilled modeler, this is a great kit. If you're a beginner, the poor instruction sheet and the 'moving' parts makes this kit a stinker. Is it accurate? Comparing this kit with pictures on the web, I'd say it's pretty accurate. Check out http://w3.nai.net/~jp/n_heller/speed.htm. There has been some discussion over the 1/25th scale but I think it's been generally accepted that the Mach 5 was a small car with a small driver. What's in the box? The kit comes with decals, 4 'rubber' tires, 24 chrome plated parts, 4 (questionably) clear parts and 49 parts in white plastic. There are also two small screws to attach the chassis to main body but these are not mentioned in the instructions. The kit was free of flash and test fitting showed that part fit was pretty good. The Options The model includes optional front saw blades, optional ion jack stands, optional underwater bubble canopy, opening robot bird panel, optional position periscope, opening rear panel (to show all the gubbins therein), and working steering. I pretty much ignored the options. The only one I thought about using were the saw blades but the blades were too thick to be realistic. The jacks detract from the car's look and the bubble canopy just didn't work for me. The steering is a bear to make work. |
|
The Instruction Sheet This is a really nice kit but the instruction sheet stinks big time. Remember that we're trying to get kids to buy model kits - these instruction would baffle a Mensa member. Why don't I like the instruction sheet?
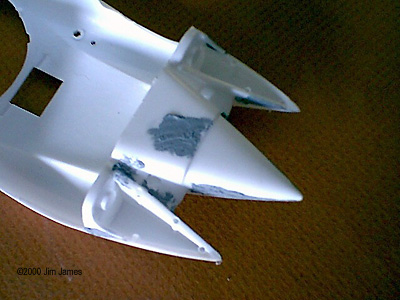
The entire painting instructions apart from suggested colors (black, red, blue, etc.) Not even a "see box for painting guide." Luckily the box does have some good color photos of the finished model. Modifications I made three modifications to the kit - all pretty easy. 1. I cut the nose off the chassis to allow easier hiding of the seams around the nose. 2. I cut the steering column to disable the kits' steering mechanism. 3. I added a license plate. Use President typeface (or e-mail me and I'll send you the art work). This is just a piece of printed paper stuck on a piece of sheet styrene. Painting Painting is pretty simple: Assembly I worked on two basic assemblies at the same time - the car body and the chassis. The Car Body. The molding seams on this kit are almost invisible and the only serious seam is where the chassis joins with the top around the front. Since these parts are one of the last things to assemble and I hate to mask, I cut off the front half of the chassis and glued it in place . I filled and sanded the resulting seams. I assembled the fins and set aside the remote bird hatch and rear engine cover with periscope in place (retracted). I sprayed these parts with a flat white (Testor's Racing Sprint White) and sanded and sprayed until I had a smooth finish. I sprayed these parts with Testor's Glosscote and applied the decals - be careful with the 'M,' it's a bear to get straight. I painted the back of the front wheel wells (triangular section to the rear of the front wheels), the inside of the scoops behind the seats and the inset areas surrounding the exhaust holes, flat black. These were masked with tape. I then sprayed another coat of Glosscote, removed the masks and set these assemblies aside. Since PL does not include the inside of the front wheel wells, don't forget to paint the underside of the hood/wheel fairings, flat black. You also need to paint the inside of the rear back, flat black, since this is also visible. |
|
|
|
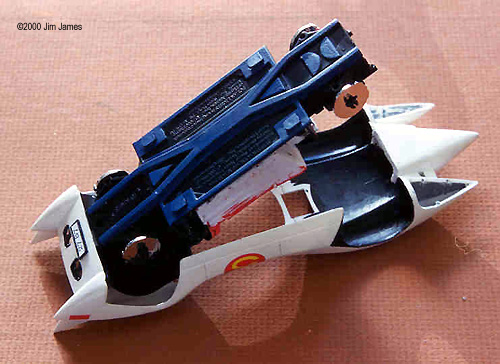
I painted most of the chassis parts flat black before assembly. I used Humbrol Signal Red for the tub interior which I detailed with light gray, black and silver. I assembled the axle assemblies but did not add the wheels yet. The front wheel assembly is supposed to turn with the steering wheel but don't hold you breath since the connection between the rod and axles is real loose. Your best bet is to cut the steering rod in half and leave off the lower half - leaving the front wheels to be positioned manually. |
|
Paint and assemble the chassis completely except for the exhausts and driver's mirror. You can add the wheel assemblies and the disk brakes just before final assembly. Note that the disk brakes glue to the axles and NOT to the wheels as indicated in the instructions. Final Assembly When everything is dry and you have really clean hands, you can mate the chassis with the body. Position the remote bird hatch and rear hatch and hold them in place with low tack or masking tape. Start by positioning the rear end and work the remaining chassis into place. You will have to force open the body to allow the chassis to slip into place. Do this gently but firmly. There's a lot of give in the body. Don't forget to slip the rear hatch prop and the rear hatch into place as you work the pieces together. Once in place, drop a little CA to secure the front end (if needed) and use the screw provided to secure the back. Now you can add the remaining pieces. Remember . . .This is a cartoon car. All painting should be solid colors with no shading or weathering. |
|
![]()
This page copyright © 2000 Starship Modeler™. Last updated on 30 September 2000.
![[Side view]](jj_mach5_sideview1.jpg)
![[Top view]](jj_mach5_topfromfront.jpg)
![[Underneath]](jj_mach5_chassis.jpg)
![[Rear hatch up]](jj_mach5_rearhatchup.jpg)
![[Headlights]](jj_mach5_headlights.jpg)
![[Top view]](jj_mach5_topfromback.jpg)