
|
By Dave Ruther - images & text © 2003
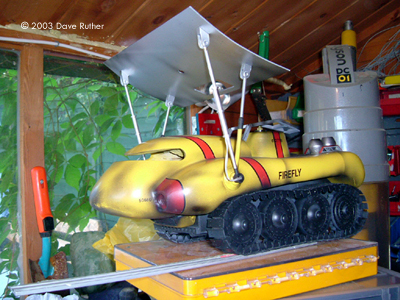
I've been a fan of the Gerry Anderson shows since I was knee high. Shows such as 'Thunderbirds' and 'Captain Scarlet' have been my number one inspiration to get into modelling. This is primarily to do with the wonderful special effects and totally original (and often believable) designs of the vehicles. There have always been toys available and model kits. But to me, they were often un-realistic or just too plain small! I want something that will catch peoples' attention when they walk into a room, something that will make them say “hey, that's just like the one on TV!” |
![[Click to enlarge]](dr_ffly/dr_ffly_fireflysand2.jpg) |
|
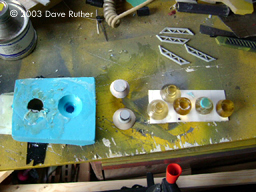
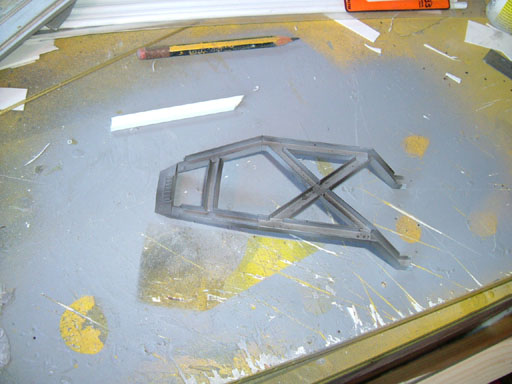
Image: The 'box' section carved to the basic shape Image: Tracks Image: Wheel molds Image: Master wheel half piece Image: Filling and sanding .... Image: ... and sanding and filling .... Image: Finally, the body was done Image: Painted wheels, on brass axles Image: Chassis takes shape Image: Widgetology Image: Foam "suspension" fitted Image: Masking off the stripes Image: Masking removed Image: Stripes and text added Image: Fitting wheels and track Image: It works - cool! Image: Darkening the running gear Image: Weathering Image: More weathering Image: Detail bits and the alginate mold Image: Dozer blade, front Image: Dozer blade, rear Image: Protective cage takes shape Image: Box and aerial assemblies started Image: Blade installed Image: The blade can be raised Image: Finishing the detailing in back Image: Windscreen in place Image: Details, done |
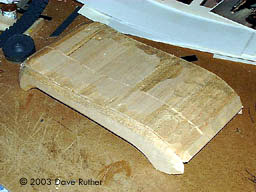
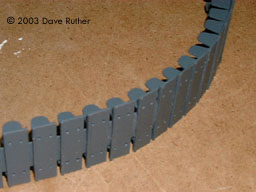
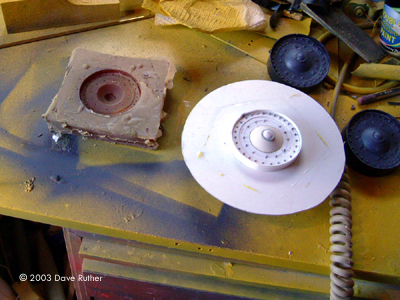
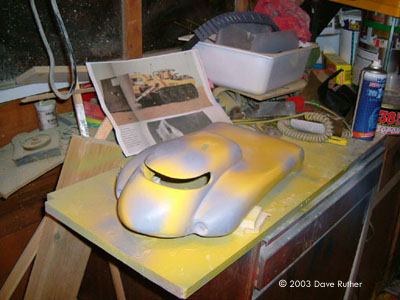
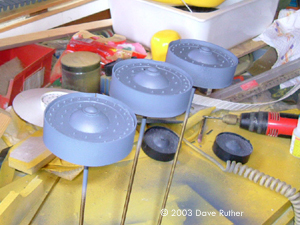
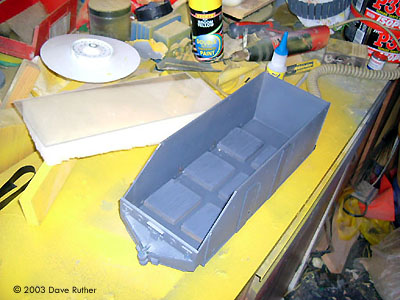
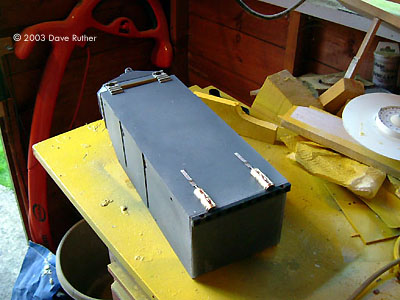
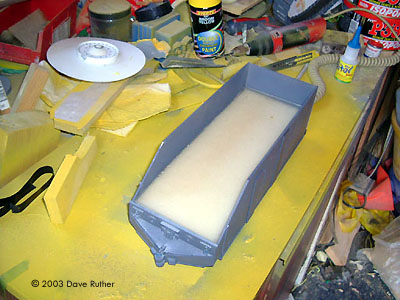
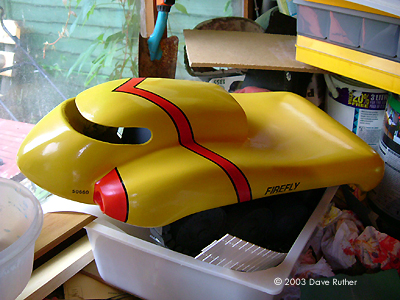
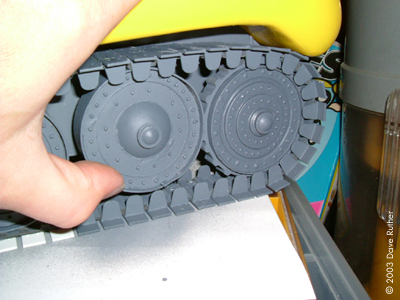
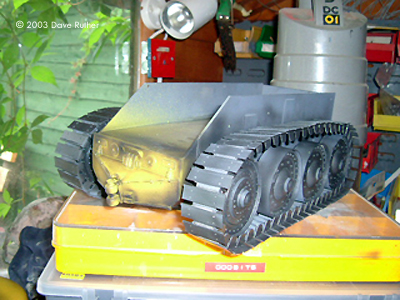
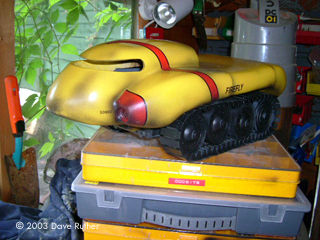
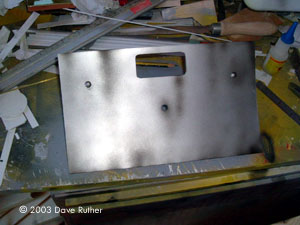
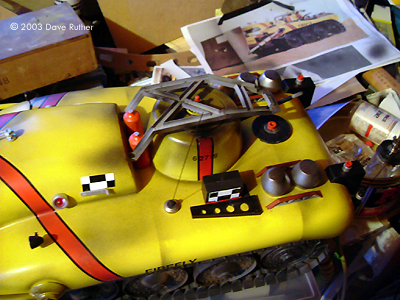
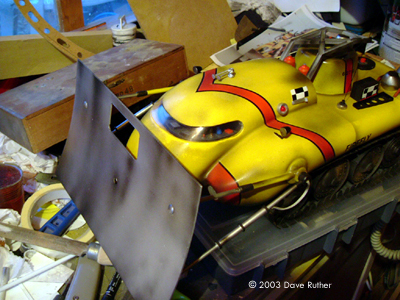
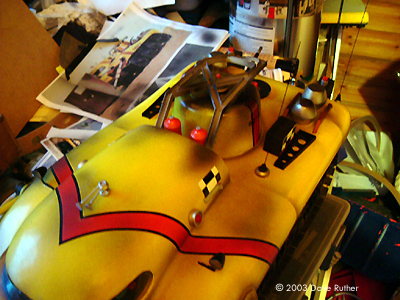
For me, models must be as close to the real thing - in this case, the studio models - as possible. There are quite a few Anderson modellers out there and I try to opt for models that are not the most common choices. These are vehicles that wouldn't necessarily be 'stars' of the shows, but would certainly be recognised by anyone who was familiar with the shows. When it comes to Anderson's 'Thunderbirds', everyone knows what the Thunderbird craft look like. Over the years I've built all of these (except Thunderbird 5). Also, viewers of the show would witness (most weeks) some kind of weird and wonderful rescue vehicle emerging from one of Thunderbird 2's pods. I had already built the 'Master Elevator Car' in studio scale and prior to that had built a studio scale 'Mole'. For my next project I turned my hand to International Rescue's fire fighting machine - The 'Firefly'. As with the 'Elevator Car' (and countless other Gerry Anderson models!), the studio model of the Firefly incorporated the use of the good ol' 'Airfix Girder Bridge' (now available from Dapol). From these recognisable parts, I was able to scale up my plans to suit. I decided on balsa wood for the material of choice. I only planned on building the one model, so had no need to make moulds and fibre-glass copies. I cut the wood into sections and glued it together into an almost box section. Having recently built the 'Maximum Security Vehicle' from 'Captain Scarlet' in the same manner, this was almost deja-vu! The 'box' section was then carved to the basic shape of the Firefly. The cabin section was also made into a separate balsa box section. The most tedious part was yet to come… As with a lot of the 'Thunderbirds' tracked vehicles, they used the tracks and wheels from a 'Vickers' toy tractor. I have yet to ever come across one of these toys and they certainly seem to be rarer than 'rocking horse poo'. Therefore, I had to make the parts required. These consisted of two sets of tracks, 6 idler wheels and 2 drive wheels. I cut plastic sheet into individual plates, to which were glued a smaller plastic section and two curved uprights. Each plate was drilled with 4 tiny holes. The plates were then glued to a length of thin plastic card, to enable them to form the tracks. However, when they were bent a few times, the plastic card snapped in various places. I then decided to glue them to the outside of an old cam belt from a car! Perfect, they could bend and operate like real tracks! Next job was the wheels. I made one idler wheel from plastic, with metal panel pins glued into tiny pre-drilled holes. From this I made a latex mould and cast 12 wheel halves from resin. I then found that the outer rim of the wheels was just too brittle, so sanded these off and replaced them with a plastic rim. The main model was then turned to for some serious sanding, priming, filling, blah, blah, blah! The cabin was fixed onto the main body using automotive filler and then I began again - sand, fill… I must have sprayed the thing with top coat about a million times! Because after every 'last coat', I would either notice marks under the surface, or the paint would react funny, or it would run! I should have bought shares in yellow paint! Still, eventually, the task was done. Whilst the paint was drying, the wheels were painted using dark grey paint and fitted to brass axles. A box section was then made up from Perspex sheet to house the axles. This was detailed with plastic card and widgets. With elongated holes drilled through both sides to accommodate the axles, I cut a section of foam and placed it into this section, holding it in place with another piece of Perspex. This foam would serve as the 'suspension' when the axles were fitted. Now that the yellow paint had dried, I masked off where the red stripes should be situated and airbrushed these on using enamel paint. The quality of the masked lines wasn't too crucial, as these would eventually have black lines running down them. The Next Day My model building experiences come in two types. There are the models that I start with the best intentions, but never finish. Or there are the models that I start with sheer determination and it becomes almost an obsession to get them finished! I think this model has come under the latter, as no sooner had the sanding dust settled, I was off again… |
|
First job was to get the wheels finished. When I built the 'idler' wheels, I made a mould using latex. Smashing stuff, but for one obstacle - it takes ages to set and to get a good mould, you need to apply it in layers. The bottom line is it takes about a week to make a decent mould. I didn't fancy splashing out on RTV rubber, so used something that all you dentists should be familiar with - Alginate. This is a blue powder that when mixed with water forms a smooth paste. It's used by dentists to take moulds of your teeth! The good thing (or bad thing if you aren't quick about it) is that it sets in around 3 minutes! I built a master of the drive wheel, again using panel pins fitted through drilled holes for the rivets. A plastic card wall was built up around the wheel and the alginate was mixed up and poured in. One of the problems with alginate is that the moulds only last for about a day, as they dry up, shrink and go brittle. Therefore, it was a case of pour the resin in, pace around the garden, tip out the cured wheel and start again. Only four wheel halves were needed, so this didn't take too long. Whilst the wheels were drying completely, I added the dry transfer 'Firefly' words down the sides of the main model and added the black stripes. The cowl underneath the vehicle was cut from balsa and covered in automotive filler. A very important lesson, which I learnt, was to put tape over the model and then use automotive filler to get the correct contour of the part you're fitting. This way, I was able to build and paint the part separately, without having to blend in gaps and end up re-spraying the model! This cowl was fitted with a grill and glued underneath the cabin. The wheel halves were then glued together and fitted to the brass axel. The track was cut to the correct length and glued back together over the wheels. Plastic tube was fitted over the axles to prevent them from moving from side to side. The drive wheels were wrapped in a thinner piece of cam belt, which locked into the 'teeth' of the cam belt on the inside of the track. What's more, the suspension worked a treat! Day Three I came to realise that the tracks/wheels were too light in colour. Therefore, I airbrushed over them with a black/dark grey paint mixture. I also used this colour to 'dirty down' the main body of the vehicle. After all, the thing is supposed to look like it fights fires! The next job was to replicate the detail over the vehicle. As mentioned previously, I had already located the 'girder bridge' parts and had these to hand. However, the other parts were a bit harder to track down, so I ended up having to make these from scratch. There are 5 drums on the back of the vehicle, which look like beer kegs (!). I could find nothing remotely like this shape, so made one using plastic tube and car body filler. I made a mould using alginate and cast a further 4 out of resin. I figured that the shovel, that sits in front of the vehicle, would need to be a pretty good fix (especially as it had to be able to move up and down), so I made a master pivot from half a ping pong ball, plastic card and tube and cast 2 copies in solid resin. Anyone walking into my workshop and finding these would probably think they were false nipples! Day Four: Almost There .... As I said earlier, I was itching to get this thing finished. It had now become my legacy!The shovel was cut from thick plastic card and bent to get the subtle curve in it. Brackets were made from plastic card and fitted with pins - which would line up with the arms when fitted to the Firefly. Rivets were fitted to the front of the shovel and the window and cannon holes cut out. This entire assembly was sprayed aluminium and weathered with my airbrush. The arms were made from brass tube and fitted through holes drilled into the pre-made pivots (those nipple shaped things!). More brass tube was fitted through the back of the pivots and located into holes drilled into either side of the vehicle. The final touch was the wires running from one of the arms to a small hole in the pivot. Next job was to start on all of the greeblies on the back of the Firefly. The 'beer kegs' were sprayed aluminium and glued into position as were the girder bridge parts. An empty mousse tub proved to be the exact shape for the turret thingy on the back of the vehicle. A slot was cut into this and a cannon/extinguisher/whatever made from brass and fitted inside. This was sprayed yellow, more red/black stripes added and rub down number transfers. The protective cage that sits atop this turret thingy was made from plastic girder section and sprayed grey. A VERY fiddly job, I can tell you. I swear (and I did) there was more super glue on my fingers than on the blooming plastic! Next I made up the two box sections and the aerial assembly that sits at the back of the Firefly. These parts were painted matt black and glued into position. A cockpit was then made up from plastic card and kitted out with miniature switches, levers, microphone, lights and dials (none of which worked!). The 'Virgil' figure was a soldier model coated in car body filler and roughly worked into shape. Basically, he's supposed to be wearing a flame resistant suit and headgear, and this quick and easy process did the trick. He was then sprayed white with the face window painted. I then heated him up (as you do!) and bent him into a seated position and glued him into a plastic card seat. Day Five: Details I proceeded with the fiddly bits and pieces and jobs that I had put off, such as the windscreen…Following advice from my better half, I attempted to build the windscreen from an old lemonade bottle. Alas, after much cutting, marking and swearing (in that order), it was just slightly the wrong shape. I really couldn't face building a wooden former and vacuum forming, so attempted using a flat piece of clear styrene sheet. I carefully marked it and cut it to the right shape and size. Then I cut slots into the window recess in the model. I eased it in and…presto! It popped in like a real windscreen! Little dabs of glue in the corners stopped it from coming back out. Don't you just love it when the worst jobs turn out really easy? Next task was various bits and bobs, including the wing lights which were made from the ends of model aircraft missiles, headlights which were the caps from containers and the twin roof horns which were stretched plastic tube with the tips of more aircraft missiles! Other sundry items consisted of the chequered signs, girder sections made from plastic sheet and aerial holder which was the nut from a toggle switch (appears to be the same as the one used on the original…). Also, the red canisters, which were the engines cut down from an X-Wing model. Day Six: Done Job done… The only bit I left to last was the glazed panel in the shovel. This was simply made by cutting out a piece of clear Perspex held into place by a front and back plastic surround. This surround was given 'rivets' applied using dabs of super glue. I'm certainly no photographer, but the shots of the finished model (in typical 'Thunderbirds' style) didn't come out too bad. The 'Thunderbird 2 Pod' set is about 4 foot long and about 2 foot high, with a sky scene outside. |
![]()
This page copyright © 2003 Starship Modeler™. First posted on 13 November 2003.
![[Click to enlarge]](dr_ffly/dr_ffly_fireflysand.jpg)
![[Click to enlarge]](dr_ffly/dr_ffly_fireflypod3.jpg)
![[Click to enlarge]](dr_ffly/dr_ffly_fireflypod2.jpg)
![[Click to enlarge]](dr_ffly/dr_ffly_fireflypod.jpg)