
By Vince Hoffman - images & text © 1999
|
![['Box' art]](vh_kr_1.jpg) |
|
|
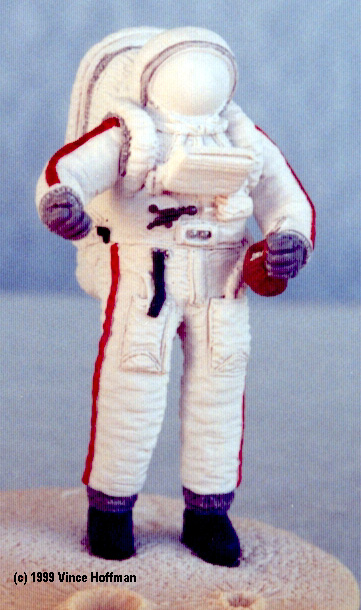
The Soviets raced against NASA to get the first human on the moon, but technical difficulties throughout the program (especially with the massive N-1 launch vehicle) eventually forced them to cede the glory of that accomplishment to NASA. One bright spot in the program was the the Krechet ("Gyrfalcon" in Russian) space suit. Designed and built by the Zvezda bureau, it was the first semi-rigid design ever built, with a hard metallic shell for the torso and (relatively) soft cloth arms and legs. This is the same concept that is now incorporated into both the Russian and American spacesuits. The hinged backpack, when opened, allowed the cosmonaut to climb into the suit through the rear, greatly simplifying the donning of the suit. It was also considered more reliable than suits with a more conventional zipper opening. The control panel on the chest area of the suit provided the wearer with consumables status and communications; it could be folded out for use or stowed against the chest when the cosmonaut was busy.
The model came with 11 resin parts, one wire rod and one plastic rod. The Russian flag and shoulder patches are printed on paper and care must be taken when cutting and handling because the ink scratches easily. The instruction sheet is good, containing notes on working with resin and how to assemble EVA's figures, but provides no illustrations or exploded assembly views. Fortunately, the photograph on the cover sheet is excellent so line drawings are not necessary. ConstructionConstruction is straightforward. There are two different poses to choose from: the flag-waving patriot or on the job collecting soil samples. For each pose, 2 different arms are supplied, along with wire and plastic rod and extra parts necessary to complete the pose. Each part was removed from the sprue and cleaned up. A slight seam line on the torso was nearly invisible and light scraping with the knife removed it completely. The pour lug on the arm pieces is attached at the inside of the shoulder so when the parts are cleaned up, any sloppy removal will be hidden inside the joint. Care must be taken when attaching the arms as some folds in the torso correspond with folds on the arms; note that these folds help to align the parts. The same goes for the sample bag, which fits into the left hand. After the arms are attached, the feet are securely glued to the base and the torso assembly is glued to the feet. It is necessary to attach the feet this way because they fit at odd angles into shallow footprints in the base. Do not attach the shovel or the flagpole at this time, as they will only hinder the painting process. PaintingAfter the dust settled from construction, several light coats of gloss white were airbrushed over the model. I prefer gloss to flat paint because it dries very smooth and is much more forgiving when a wash is applied. After the white base coat dried, all of the details were painted in their appropriate color. I carefully studied the cover photograph and visited Karl Dodenhoff's excellent My Little Space Museum to determine all the different details and colors. After studying the photos of the real suit, the various mechanisms on the side and front of the suit became more obvious and easier to paint. After the details were painted, the whole figure was sprayed with a barrier coat of clear gloss lacquer. The lacquer dries very hard and will prevent the wash from mixing with the base colors and ruining the finish. The figure was then left to dry for 2 days. I applied a wash of artist oil 'burnt umber' and airbrush thinner to various recesses to accent shadows. Small areas of the model were painted with the wash then wiped off with a soft cloth. It is important to do this to areas about a half square inch at a time because the thinner will evaporate quickly and leave heavy deposits of pigment. The oil wash took about 4 days to completely dry. After the oil wash dried, the sample scoop was attached to the plastic rod and slipped into the right hand. Then the handle was glued to the end. A light spot of glue holds the scoop in place on the sample bag. I then drybrushed with white to tone down the heavy shadows made by the wash. Then the shoulder patch was applied. EVA suggests forming the patch against the shoulder first, then affixing it with white glue and sealing with clear flat. Then the whole model is sprayed with Pactra clear flat. The final step is to paint the helmet visor with enamel gloss black - I prefer enamel paint because it dries much slower and produces a much nicer shine than it's acrylic counterpart. Finishing TouchesThe final step is to complete the base. The moon surface looks very unrealistic if just painted gray and left alone, so a little imagination is required. The base was first painted a neutral gray. Grey powder was made by grinding artist charcoal sticks into fine dust and mixed with plaster until the appropriate shade was produced. The base was then painted with a thin coat of flat varnish and a liberal dusting of powder sprinkled all ove. When the varnish dried, the dust was removed by lightly tapping the bottom of the base. The base was then securely glued to a finished wood plaque. |
|
Conclusion
I found the Krechet model very easy to build and paint. I spent 2 weeks on it because I had to do some hunting for reference material and ended up re-painting some minor details. Anyone who has never built a figure would do very well with this model, it is easy to assemble and there are very few colors and details to paint. Because of the high quality of casting and very fine detailing it makes a nice project for the experienced figure painter. I highly recommend this kit for anyone interested in real space subjects, the price is right and Chris at EVA Models is very helpful in providing reference material and help with construction questions. Many thanks to EVA Models for providing the review sample. |
|
![]()
This page copyright © 1997-9 Starship Modeler™.
Last updated on 2 August 1999.
![[Parts]](vh_kr_2a.jpg)
![[Base coat]](vh_kr_3a.jpg)
![[Washes]](vh_kr_5a.jpg)
![[Front]](vh_kr_6a.jpg)
![[Side]](vh_kr_7a.jpg)
![[Rear]](vh_kr_8a.jpg)