|
|
|
|
|
|
Overall Rating (1 Bad <<>> 10 Excellent) Overall: 7 | Ease: 10 | Quality: 8 | Accuracy: 8 | Instructions: n/a | Decals: 0 Verdict: Small, inexpensive promotional model. Gets folks talking about the Space Program, and the ISS in particular. |
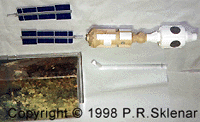
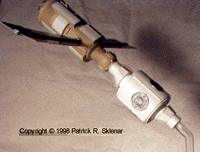
 Size comparison. That's a penny next to it. 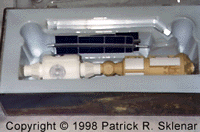 As delivered, all parts still in the "box".
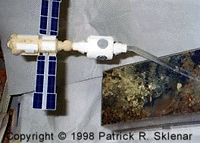
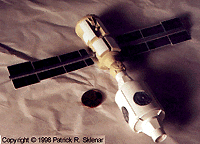
All the parts layed out. Assembled and on its stand.
Larger view, notice details on hatches.
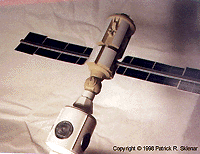
Docking port on on Russian built Zarya.
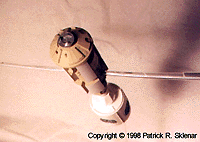
A better view of one of the four module mating ports on the US build Unity node. |
Getting Oriented In an unusual change of pace a model railroad manufacturer, InterMountain Railway Company has joined with Johnson Engineering of Houston, Texas to produce a 1/144 scale injection molded styrene kit of the Internation Space Station (ISS). This kit will be produced and sold in two ways - pre-built & painted or unassembled. The former is intended for schools and museums while the latter is targeted at individual modelers. The unassembled kits should be available by around Christmas '98 direct from IMRCo and also from RealSpeace Models. Not being able to afford over $1500 for a museum quality model which is available now, I plan to purchase a kit from RealSpace Models. However, until that's available I decided to buy their other option - a pre-assembled partial station for $24.95. In fact, this partial station consists of only two modules - the Russian Zarya power module and the American Unity mating node. It represents the ISS as it will appear after Assembly Flight 2A in early December 1998. Opening the Box The model arrived on my doorstep well packed in a long narrow box full of foam peanuts. Buried inside was a plastic box with a satellite photograph lining 5 sides. The sixth side revealed the top image. Opening the package, laying out the few pieces and flipping the box over to it's intended Ddisplay stand position reveals the second image. All you have to do is mount the station piece to the display stand and slide the two Solar Arrays into their sockets. Voila'! You're done. So, how accurate a representation is this model? Well, NASA has released 1/100 scale drawings of the station. Based on the dimensions and layout of these plans, the IMRCo Flight 2A model looks pretty good. Probably the most out-of-scale aspect is the t hickness of the solar arrays, but since the real ones are going to be only 1 inch thick, I don't know what you could make 1/144 scale ones out of that would be strong enough to not simply wilt. the model's color looks to be pretty close to the images NASA has placed on the web so far. But insulating blankets are not modeled. Unfortunately, most of NASA's posted "artist conceptions" don't clearly show the proposed blankets yet either. So I would say that adding blankets to this 2A configuration is going to require a bit more time in order to get real photographs of the hardware once Endeavour mates Zarya & Unity this December. Beyond these issues (overall color, blankets & solar array thickness) I love it. And it's not really fair to hold these issues against the model at this time since real, honest to goodness photos aren't available yet. The casting is *very* clean and sharp. The detail matches what is known so far of the real article. It's led to increased discussion of and education about the Space Program at work, where I display this model over my workstation. This alone makes it, to me, well worth it's cost. Building the Kit There's not much to it -
References NASA's ISS Home Page |