
By - images & text © 2003
|
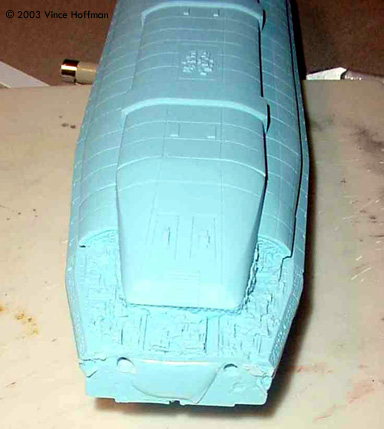
The Athena is seen in the last few minutes of the movie Starship Troopers, and although it has very little screen time, the spaceship (and the model) are worthy of much more. The Monsters in Motion kit parts are cast in a very nice, clean polyurethane resin tinted light blue. I found very little flash on any of the parts and some minor parting lines on most. The parting lines are easily removed or ignored as they usually happen along edges or well hidden areas of the model. Some bubbles are found and are easily popped off the surface. The largest piece of the model is hollow cast, which makes for a surprisingly light model when the entire kit is assembled. The kit comes with a single page, double-sided instruction sheet with clear black & white photos of the model under construction. |

|
Although the parts are not numbered, it is easy to see where each piece is to go. A painting guide is not included in the kit, but two photos on the instruction sheet show the decal locations. Because of a lack of reference material for this model, painting and weathering is left to the modeler's imagination.
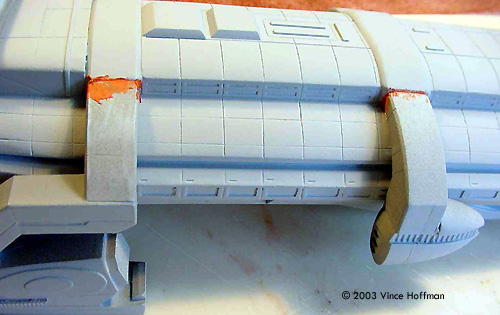
The decal sheet included with the kit allows you to portray only the Athena. The Roger Young decal set provided by JT Graphics will provide you with more variety. Cleanup and Assembly Parting lines and flash were easily cleaned up on all of the parts. I paid the most attention to the three hull section attachment points, nose to fuselage and engine to fuselage. Each of these surfaces must be sanded smooth and test fitted to assure a good bond. Alignment pins cast into the parts negate the need for drilling and inserting brass pins. This is a nice feature not found on many resin kits. The pontoons were glued onto the fuselage, and the gaps filled with Bondo Glazing putty, sealed with a drop of thin CA glue and sanded smooth. These joints were the only areas which required putty. The entire model was assembled except for the truss, which was initially left off to make painting easier. |
|
|
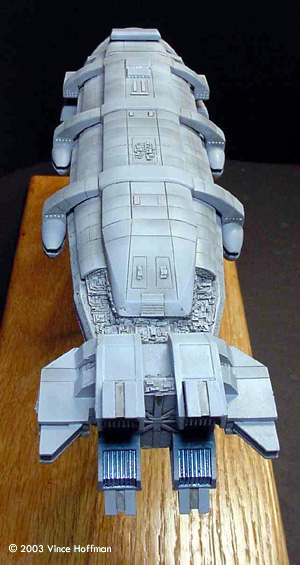
Image: Top/rear view Image: Right/rear view |
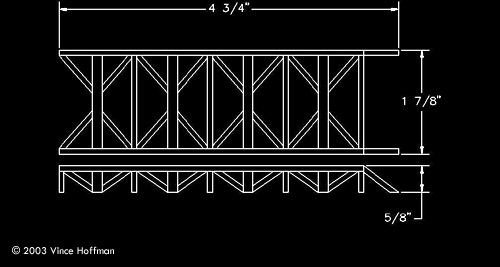
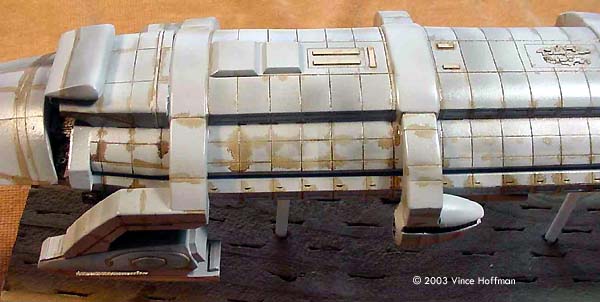
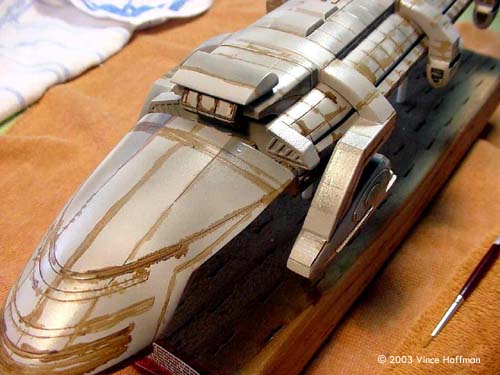
Minor problems As with most resin kits, there are trials and tribulations. Fortunately with this kit, the problems are few and most casting flaws are well hidden. The most obvious problem is a latticework part that attaches to the bottom. This piece was cast using an open-face mold and warped badly, and the worse side of the piece would be clearly visible once in place. I replaced this piece with a scratch-built assembly - more on that later. On the front section, there are some scribed panel lines which appear to have run off the scribing guide. These can be repaired by a small amount of filler and re-scribing to the original panel line location. There are also numerous erratic scribe lines on the bottom of the model and on the 'pontoons'. Filling with putty and re-scribing can also fix these. This model, however, was built correcting none of the scribing flaws, but I just couldn't help myself when I saw just how badly cast the truss was.The Truss Scratch building the truss, which runs along the lower-rear portion of the model, is not difficult, although your ability to accurately cut many identical parts will determine your level of success. I started by test fitting the kit part, to see how well the part fit, and concluded that it was Ľ" narrow and ˝" short and didn't align well with the details around it. Taking the new dimensions into consideration, the latticework size and spacing was measured and individual parts were cut from strips of plastic. Patience is required while cutting and assembling, but the results were well worth the effort. |
|
Painting Now came the fun part! Prior to painting, the model was mounted on a temporary stand consisting of a 2x4x12 and two wood dowels pressed into the model's existing mounting holes. Step 1: Priming the model After the model was assembled (without the truss in place) it was sprayed with Duplicolor automotove sandable primer and checked for any last minute touch-ups. A few seams were found and filled. Then the model was shot with a second coat of primer where the touch-ups occurred. Step 2: Painting the details The gray primer makes a very good, smooth base coat. On top of the primer, a series of acrylic dark gray panels were airbrushed using Post-It notes as masks. Panel highlights were applied along the scribed lines, and added in between the scribed lines to give a greater depth of detail. Once the various panels were painted, individual details are picked out and panted colors other than grey. The panel highlights and additional colors give the model a little more visual interest rather than being a homogenous grey space torpedo. Step 3: Sealing the paint Once again using my airbrush, a clear gloss acrylic was sprayed over the entire model. Every detail and surface was covered. This layer acts as a barrier between the paint below and the oil wash to come. A full 24 hours were given to allow the gloss acrylic to cure completely. At this point, the decals were applied and another coat of clear gloss sprayed onto them as a sealer. |
|
![[Right/rear view]](vh_2ath_donerear2.jpg)
|
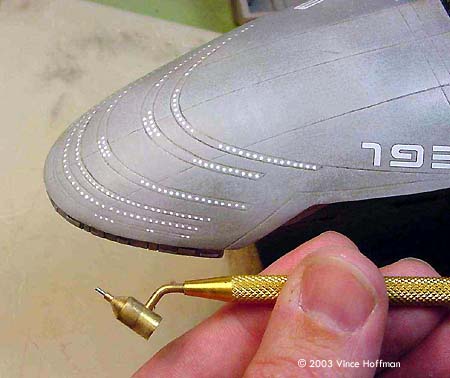
Step 4: Applying the wash An oil wash was prepared using artist oil paint 'burnt umber' and paint thinner. It is very important to use only paint thinner or mineral spirits, and nothing stronger (Testors airbrush thinner is too strong) and don't even consider using lacquer thinner, this will easily dissolve your acrylic paint. The wash was strained to remove any un-dissolved lumps of paint. A small pointed brush was used to apply the wash to all details, scribed lines and any other detailing that deserves a little shadow. The wash was left to dry for 2 to 3 days, or until completely dried. Step 5: Removing the wash After the oil wash was dry to the touch, I lightly dampened a lint-free rag with thinner and used it to remove the excess wash. Working in small areas, the rag was wiped perpendicular to scribe lines and details. To remove more wash, the rag was wiped parallel to the detailing. Paper towels should never be used to apply or remove a wash as the fibers in the paper will pull apart and stick to the model, and the roughness of the paper will scratch the painted surface. Step 6: Drybrushing After the model had several days to dry, it was ready for drybrushing. Once again, artist oil paint were used. White paint was mixed with a small amount of black to create a very light grey color, which was then applied using a large, soft round brush. Highlights were applied to most of the raised detail, as well as to lighten areas of the paint which turned out too dark. Oil paints make for excellent drybrushing because the drying time is greatly extended, allowing you to work the paint into very soft highlights on the model's surface. ![[Starboard side]](vh_2ath_doneside.jpg) Step 7: Finishing After the drybrushed paint had several days to dry, the engines and windows were painted, and a black wash is added to the series of shuttle bay doors that run down each side of the ship. The windows were carefully painted using a fine line painting pen I found at my local art supply store. Flat white acrylic paint, thinned 1 part isopropyl alcohol to 4 parts paint, was used. Each window was then carefully 'dotted' onto the model. Engines were painted Testors Silver Chrome Trim and, after drying, painted acrylic clear blue. This gives the engines a reflective appearance. After the paint dried (once again) the entire model (except for the engines) was sprayed with a thin coat of clear matt acrylic and mounted on the permanent oak wood display stand. Conclusion Although this is an obscure subject, getting only a few seconds on the screen, I enjoyed building and painting this model and it looks very impressive in my display case. Construction was very simple, so I consider this an excellent model for novice resin kit builders and perfect for those advanced modelers who wish to hone their painting and weathering skills. |
![]()
This page copyright © 2003 Starship Modeler™. Last updated on 28 April 2003.
![[Top/front]](vh_2ath_donefront.jpg)