|
|
|
|
By Michael Dentzer - Copyright © 1999
Well, after 23 years, AMT/ERTL has issued the Space:1999 Eagle Transport so us old fans can get the chance to it right. Thank you, AMT/ERTL. I now had the chance to put the experience gained since I did my first one to work. And to make a reasonably good representation of the studio model, you sure need modeling experience. The molds seem to have held up well over the years. On examining the parts the only flaws I saw were in the fuel/landing gear pods. There were small dimples in each of the side corner panels that were no problem to fix with a little thick super glue and paper labels. Now on to the hard work. Service Module Cages I began by dremelling out the plastic sheet between the service module tubing with my smallest drill bit, and then using an X-acto knife to cut away the rest of the plastic. Then I finished with a small file. A solid week of work, but well worth the effort and sore finger tips. I then used sheet styrene to build the interior compartments.. 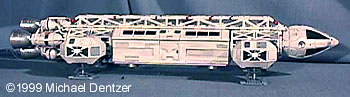 Engines First I cut off the four balls (insert jokes/snickering here) that were attached to the main engines and used metal wire to do the plumbing seen in the close-up photo. I assembled the engines onto the rear bulkhead and used styrene rods and metal wire (coat hanger) to finish the engine section caging/support. I then used paper clips and lengths of wire insulation to add the smaller plumbing (the stripety ones) to finish. 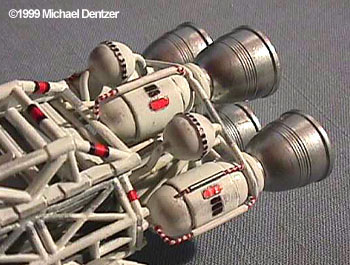
|
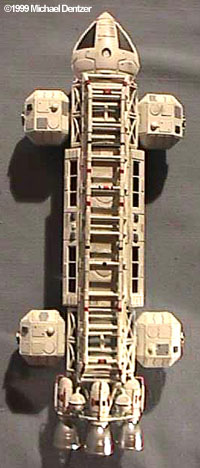
^ Top view of the finished Eagle.
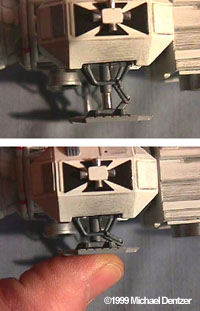
^ The original kit's landing gear are one of the most disappointing elements. With some work, excellent (and functional) replacements can be fashioned.
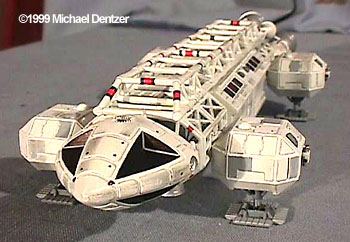
^ The end effect of a bit of accurizing is an Eagle that gives a good likeness to the series'. |
|
Landing Gear First I cut off the square sections on the undersides of the pods and covered the holes with very thin styrene. For the main struts I cut lengths of tubing from an old transistor radio antennae I had lying around. The smaller diameter sections were glued to the foot pads and fit up through the larger diameter tube pieces that I glued up through a hole drilled into the bottom of the pod. Another piece of wire coat hanger was glued into the top of the footpad tubing, the footpad slid into place up through the larger tube, and the wire bent at a 90 degree angle inside the lower section of the pod. Two pegs of styrene sprue were glued to the inside walls of the pod at opposite sides and a spring from a ball point pen placed horizontally across the pod, each end glued to the pegs and lying across the L shaped wire of the footpad. This gives the pads just the right springiness to support the weight of the model, and also keeps the pad in the right position, as the wire is held in place by the spring. Needless to say, this was the most complicated part to build. It took me a solid week of pondering to work out, but the result is great. The rest of the landing gear support structure was made using wire paper clips. Bits of styrene and staples were used to make the hinged structures. Connecting Girder The only modification to this was to add connecting bars of styrene across the bottom two of the bars that rest over the Passenger Pod are made of metal wire because.... Passenger Pod The Passenger Pod is attached to the connecting girder with magnets. I drilled and dremelled two holes into the top and glued two magnets with thick super glue. I assembled the rest of the model and painted a few base coats of Testors MM flat white and painted the raised panels with a coat of regular enamel (Testors) flat white as this is a bit whiter than the base coat and gives a good contrast. I painted selected panels on the fuel pods light gray, red,and black stripes on the girder, and finished the weathering with a number 2 pencil. This is the most effort I have ever put into a modeling project, but I had a blast doing it. I recommend this kit to anyone who wants a skill-challenging project to test and hone their abilities. The spacecraft from Space:1999 have always been one of my favorite subjects and now after 23 years I finally have the Eagle I always wanted. Special thanks to James Small and Chris Trice for reference and inspiration. |
![]()
This page copyright © 1999 Starship Modeler™. Last updated on 31 March 1999.