
By Jim James - images & text © 1999
|
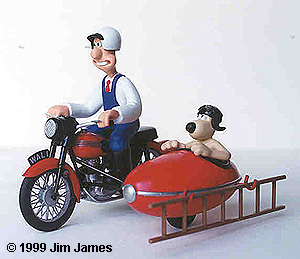
![[Look at all this stuff!]](jj_WGkit.jpg)
Who Are Wallace And Gromit And Why Are They Riding A Motorcycle And Sidecar? Viewers of PBS are probably familiar with Nick Parks' clay creations of inventor Wallace and his dog, Gromit. |
|
So are those of you who review every category of the Oscars, since Parks has won for Best Short Animated Film for two of three W&G films ("The Wrong Trousers," "A Grand Day Out" and "A Close Shave"). If you're not familiar with the plasticene duo, you owe it to yourself to go to Blockbuster and rent them. Parks' animation is superb and his attention to detail is incredible. The stories are great too.
W&G on the motorcycle are featured in "A Close Shave" in which our friends have a window washing service (hence the ladder on the sidecar) and solve a sheep rustling mystery operated by a large dog and a nice lady who runs a wool shop. During the film, Gromit's sidecar converts to an airplane – the subject of Airfix's second W&G kit. Incidentally, "A Close Shave" has a wonderful parody of the "Thunderbirds" crew loading sequence when Wallace & Gromit go from their bedrooms to the motorcycle through a succession of slides. |
 Overall Impressions – Good News And Bad News Overall Impressions – Good News And Bad News
The good news is that this is a great beginner's kit - and the subject matter is great too. The bad news is that if you are a skilled and semi-skilled modeler, you'll have your work cut out for you. Parts fit great for the most part. Perhaps the most amazing thing is the amount of plastic. Both the Wallace and Gromit figures are solid! Is It Accurate?In a nutshell, yes. What's In The Box?Unusual box but nice packaging. The cube box has a handle. The kit has 61 parts - 60 plastic and one metal rod. There are 5 decals. There are 10 small pots of Humbrol acrylic paints, one brush and a tube of cement included. The instructions are typically Airfix – all pictures, no text. The painting instructions are OK but I referred to a W&G book I have for better guide to shades and detail. It was also an excuse to watch the movie again. The Plastic From HellFor some unknown reason, Airfix molded the kit in a gray, heavy plastic with a high gloss shine. The initial reaction is that this is a soft, flexible plastic but it's not. This stuff is hard as nails and has the texture of the stuff they make model soldiers out of. And this is a problem because?
In spite of it's many drawbacks, the plastic responded well to Tenax 7R.  Assembly Assembly
Apart from the mold seams, this is an easy kit to assemble so I broke it down into four sub assemblies: Wallace, Gromit, the bike and the sidecar. The really big problem came when the sub-assemblies came together. So before you start, read the note on the REALLY BIG PROBLEM. The BikeThe bike has to be assembled first since you'll need to correctly position Wallace's arms by setting the figure on his seat. However, you can start assembly on the other sections and work in parallel. I assembled the two halves of the main body first. The wheels can be assembled separately and the rear wheel inserted after the painting on the main body is finished. All the pipes and shock absorbers can be painted separately and added. The handlebars and front wheel assembly goes together pretty much the same way. When complete, the front wheel assembly can be glued to the main body. The front wheel assembly does not pivot. One of the last things I did was add the two footrests and that was when I discovered the REALLY BIG PROBLEM. THE REALLY BIG PROBLEM
Airfix supplies a steel rod to attach the sidecar to the left footrest. OK, so far. The footrest attaches to the motorcycle with an itsy, bitsy, short, flimsy pin. This is a major structural point and it all rests on a pin which breaks off when you breathe on it. Off course, the realization of this hit me when I attached the left footrest and the pin promptly broke off. You have two choices to circumvent this problem: Option 1: Superglue the footrest on and hope. Option 2: Rebuild the bottom of the motorcycle. Being the masochist that I am, I opted for option 2.  At any point when the bike (main body and front wheels) is assembled, you can test fit Wallace and position his arms. 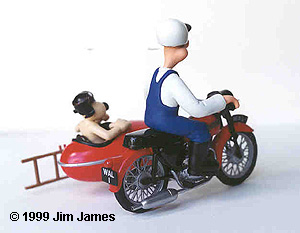 Sidecar Sidecar
The sidecar is designed to be re-used as the body of Gromit's airplane in the second kit. You must, therefore, cut/drill out a few holes before assembly. Check the instructions. I assembled the top and bottom of the sidecar without any of the interior parts. I painted the interior flat black and sealed the two openings with masking tape. I airbrushed the sidecar with Testor's Chrysler Engine Red. The wheel assembly can be added through the top opening and the seat just fits in. The kit includes the soap/porridge cannon but this really belongs on the Gromit Aeroplane kit. If you are not building the second kit, go ahead and include the cannon. Paint the cannon gold. This paint is not included in the kit and only referred to by the number 16 in the instructions. To ensure that Gromit can be placed in the sidecar without scraping paint off the figure, you need to sand/file the interior lip of the cockpit opening. Sand/file a bit and test fit as you go along.  Wallace/Gromit Wallace/Gromit
Both of the figures are easy to assemble and easy to paint but have bad mold seams all over them and hard to cover joints. Since both figures are supposed to be smooth, there's a lot of work – some of it cramped spaces – with putty, sandpaper and a file. The waist joints on both figures took me three sessions of puttying and sanding to eliminate. Then you have to do the same thing with the arm joints since the arms on both figures must be attached after dealing with the waist joints! Paint the body, head and helmet before assembly. Fit the helmet to Wallace's head before attaching the head to the body. It's a very tight fit. |
|
Painting
Remember – these are cartoon characters. No shading or weathering is really required. Spray all parts with an undercoat of flat white and allow to cure for two days first. The painting instructions with the kit are pretty accurate but Airfix won't give you the names of the paints – just the Humbrol numbers. To remove the guesswork, here are the numbers, Humbrol colors and the actual paint I used.
Wallace painting notes:  Gromit painting notes: A Grand Day Out (or maybe I was wearing the wrong trousers) Once you get past the seams and joints, this is great looking model and a really bright and unusual subject. A great first kit for beginners and well worth the amount of time and effort you have to put in as a skilled modeler or perfectionist. Cracking toast, Gromit. |
![]()
This page copyright © 1997-9 Starship Modeler™. Last updated on 28 December 1999.