
![[Griff's Pegasus - completed]](jg_pegasus_Triton-43.jpg)
|
By Jeffrey Griffin - images & text © 2015
|
Moebius Models has been giving us great model kits quite a while now, starting out with their "re-popping" a number of classic kits from the 1960's and 1970's. For the last several years, however, they've obtained the license and been giving us excellent, newly designed kits from Battlestar Galactica the New Series. This Reimagined Series, which started in 2003 by Ron D. Moore and David Eick a decade ago, gave us more of a modern, darker look at the basic storline of the Original Series from 1978. One of the first offerings from Moebius for the New Series was the Battlestar Galactica, and now they've given us her sister in the Colonial Fleet, the Battlestar Pegasus. Originally appearing in the Season Two episode "Pegasus", the battlestar of the same name was commanded by Admiral Helena Cain. However, Admiral Cain was somewhat insane, having been driven that way by the loss of crewmen and betrayal by a woman she thought was a very close, trusted person in her life - who turned out to be a Cylon model Six named Gina Inviere. Cain was so enraged by the genocide of her people, death of her crew and betrayal that she even executed her Executive Officer when he refused what he considered an unlawful order. After Cain was murdered by Gina, command was assumed by three others, finally falling to Lee Adama, promoted to Commander by Admiral Adama. Lee Adama was responsible for the destruction of Pegasus at the Battle of New Caprica, when he jumped in to save Galactica from the Cylons, setting her guns to autofire and locking Pegasus on a collision course with a Cylon Basestar, as seen in Season Three's "Exodus, Part II". |
|
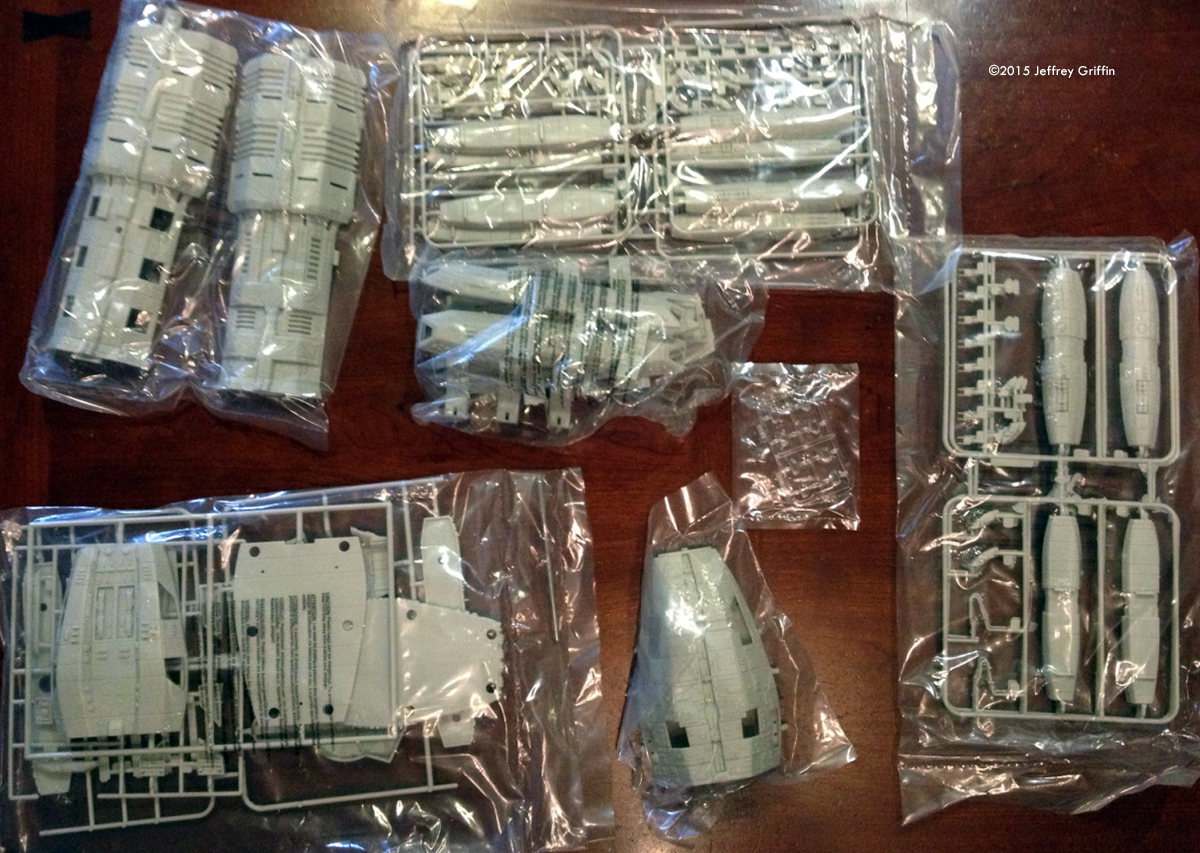
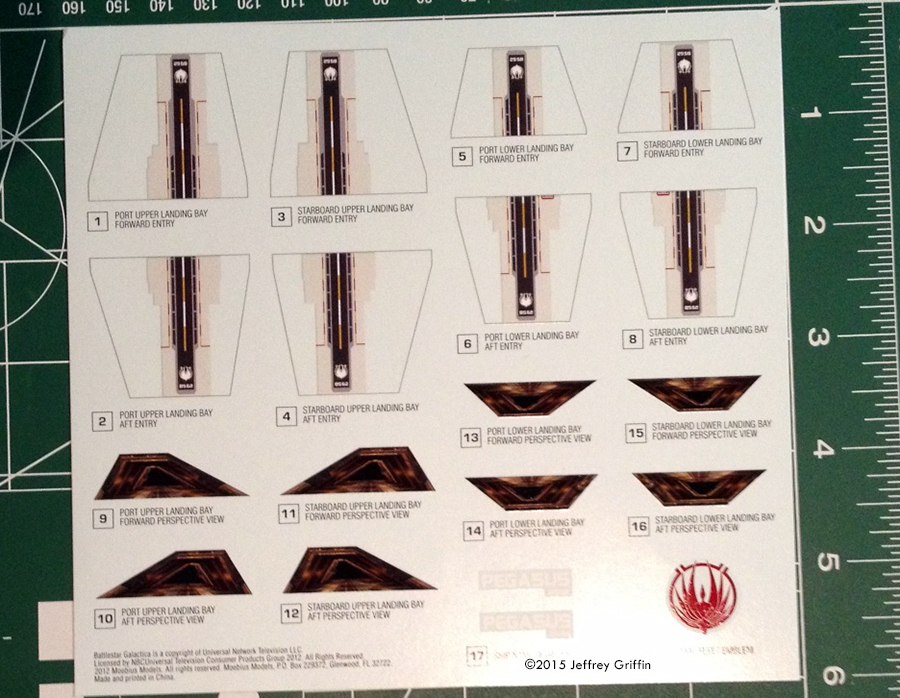
^ You'll never get all the pieces back in once you open this.... Image: What you get Image: Instruction/paint guide booklet Image: Decals
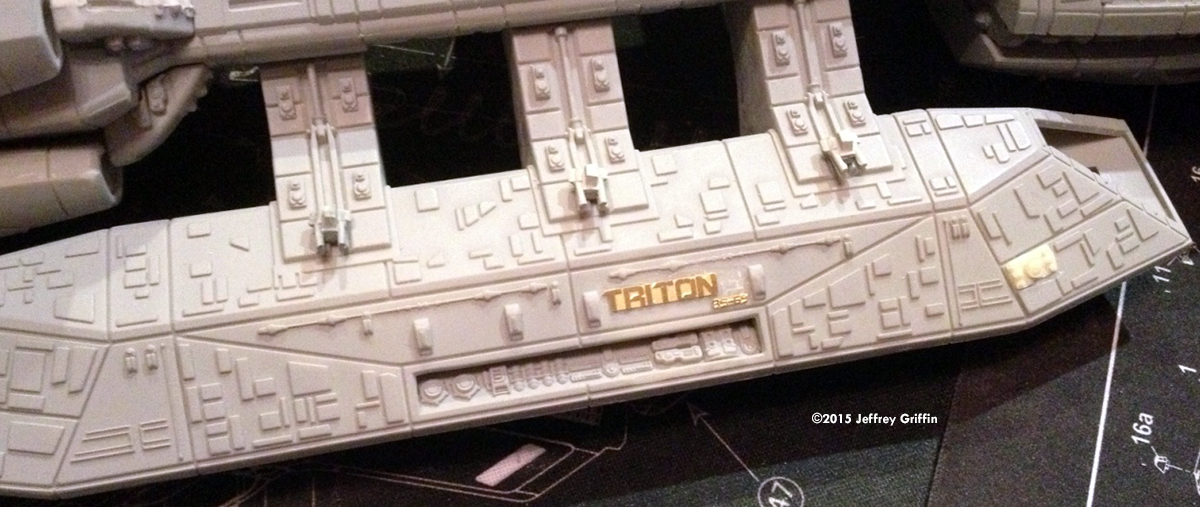
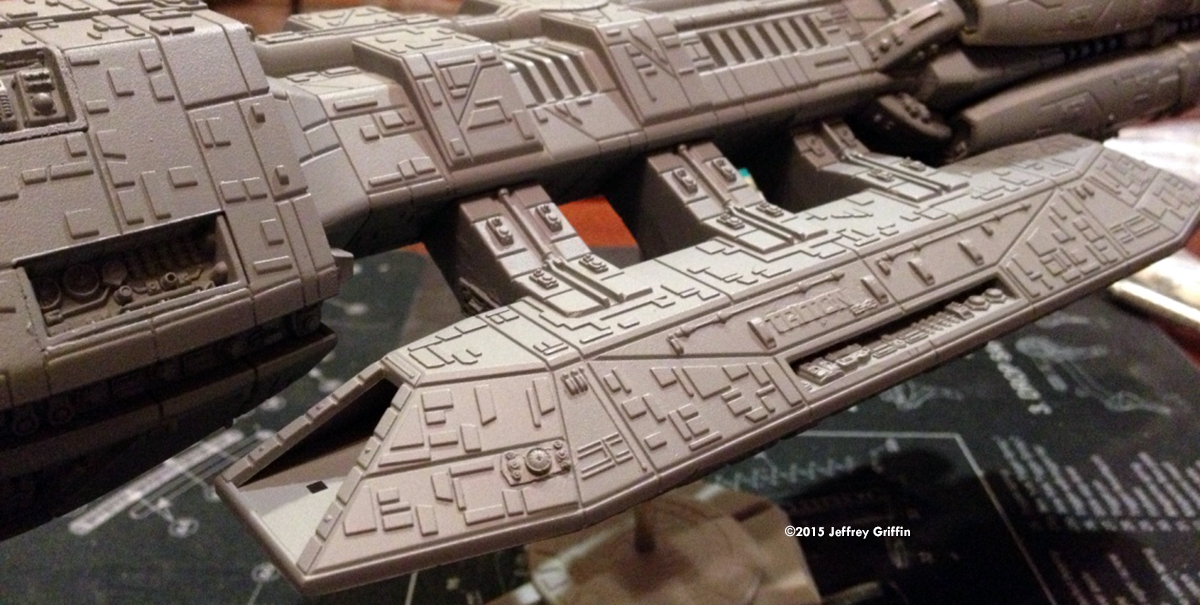
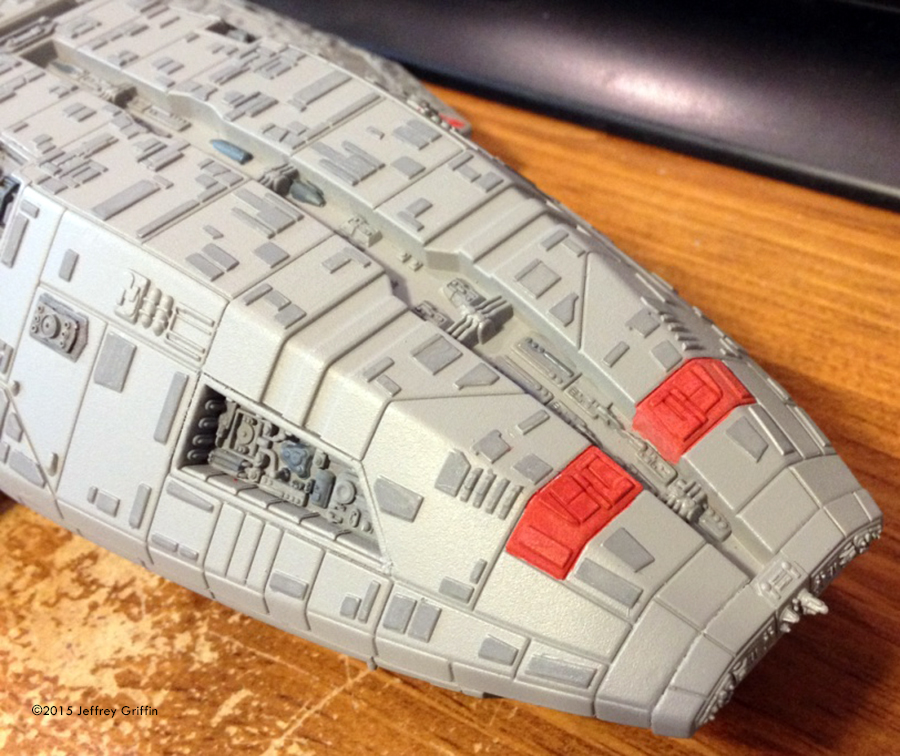
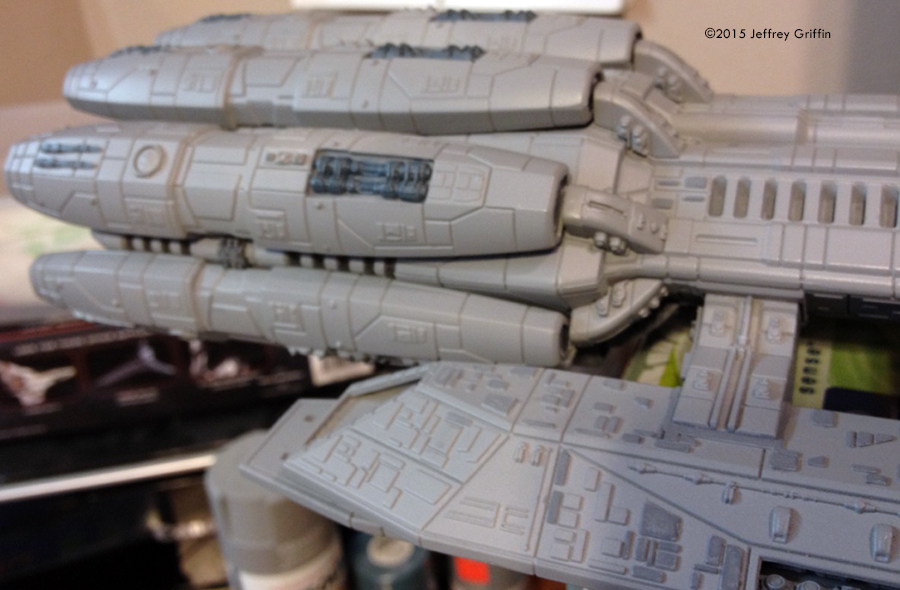
^ Bow, completed model Image: Hangar pods together Image: Adding the name from Paragrafix's set Image: Affixed to the main hull Image: Additional firepower Image: Detail painting, foreward Image: Detail painting, aft |
Like the other ships in the re-imagined Battlestar Galactica series, the model for Pegasus was designed as a computer generated image, not a physical model. The design lineage of Pegasus, listed as a Mercury-class battlestar, harkens back to the original series Battlestar Galactica design and done so purposely, per the visual effects artist Jose A. Perez. The Flight Pods on the Pegasus are connected by three "arms" and do not retract, being fixed in place. Further, the exterior, more angular design was specifically made to match the interior sets. This design included very large, fitted hull plates with gaps in between each plate - all of which is well represented on this kit. What I Got The kit comes packaged in a good-sized box with the kit parts packed pretty tightly inside. There's not a whole lot of space inside the box which doesn't contain kit parts and you almost have to have a degree in engineering to get the parts to fit back inside properly. The vast majority of the parts are connected to parts trees, with a small handful being "loose". There's some small amount of flash, most of which is in the holes and other areas where parts fit into others - all of it easily removed. Otherwise, the most of the parts are nice and clean, requiring very little cleanup except for at the connecting stub areas. The parts are all clearly numbered. The instruction booklet comes to us from Colonial Fleet Headquarters and listed as an Intelligence Briefing Supplement. Just like with the producers of Battlestar Galactica, the Colonial Fleet appear to also cut corners (something of an in-joke as to why the there are no corners on books and paper that we see in the BSG Universe) - meaning that the instruction booklet isn't traditionally rectangular as it has the corners cut off. The exterior and one interior page are printed with a grey background, all other pages are on white with black or grey text. The instruction booklet gives a nicely detailed breakdown for construction, to include telling you when to paint and decal the flight pod sub-assemblies. Any images are done in grey-scale, as well. There are no color pages at all, though the booklet does include a fairly detailed breakdown on not just decal placement, but where to paint the Dark Red markings. The instruction sheet otherwise calls for "Metallic Gray" for the main hull color. The decal sheet is much as you should expect, containing the Colonial Fleet Phoenix Emblem in "Colonial Fleet Red", the ships name and registry in white and two decals each to be used at each of the openings to the Flight Pods. Part of these decals is the Flight Deck itself, while the other is meant to give the illusion of the flight decks being all the way through - which they are not. The plastic used is a light tan in color and seems to be the same styrene used on their Galactica kit. There's a very slight residue on the surface of the parts, as most styrene kits have. As previously mentioned, some very few parts have a touch of flash, and there are the standard parts tree stubs after you remove the parts. What little bit of clean up of the parts that was required was easy to take care of with a bit of Xacto and sand paper touch ups, making short work of them. Parts fit was very nice and even pretty tight for most of the sub-assemblies. We get a lot of nice detail, to include raised hull panel details on the surface, as well as deep panel lines where they're needed. I've heard from some people that say that the detail is soft in some areas. However, I disagree and feel that there are no soft details anywhere on the model which aren't propery represented on the CGI model. From what I can tell, there are a few details that are wrong, but not many. Some of those which are wrong are simply not quite proportioned properly. From what I've seen, even the raised hull plate panels appear to be accurately placed when compared to the CGI model. |
|
My only real complaints about the details on the kit, overall, are that there are details completely missing in a couple of areas - such as in the "trench" area between each of the upper and lower flight pods at the end of each "trench" - and on the back of the "Gator Head", or forward hull section. The windows in the "trench" down teh middle of the gator head is also missing, as is detail on the sides of each of the flight pod arms. I also really dislike that they didn't open up the flight deck on each of the flight pods all the way through, instead closing them off. This requires the aforementioned illusionary decal. Also, like with the interior of the Moebius Galactica kit, there's no detail for the flight deck walls. The two-part stand is also something of a disappointment. The base is a nice, clean and crisp casting of the Colonial Fleet ship emblem for Pegasus, which includes the ships name and registry. The metal rod fits nicely into the base, as well as into the model. However, the base isn't nearly broad enough to good and truly support the model on its own. The only way to fix this so that the model doesn't weeble-wobble on you is to weight down the base itself by using an adhesive on the inside of the base itself to add some sort of weights, adhere the emblem base to a broader and/or heavier base or to use something completely different as a base for the model. Thus far, I've gone with the last choice, though I might change my mind at a later date and time. |
![[Please click to enlarge]](jg_pegasus_Triton-24.JPG)
|
Assembly and Painting First, I decided that, not having worked on a model straight from start to finish in almost a decade, let alone having only finished half a dozen or so models in teh last three or four years - yet having literally well over 100 models sitting on the shelf in started-but-not-finished condition - , I made myself a promise to see this one through within a reasonable time frame. I definied "reasonable" as no more than two weeks. I broke that promise for the timeframe, though did finish the model itself! The primary, overriding goal was to keep my focus and finish, regardless of the fact that I busted my self-imposed time limit. |
|
|
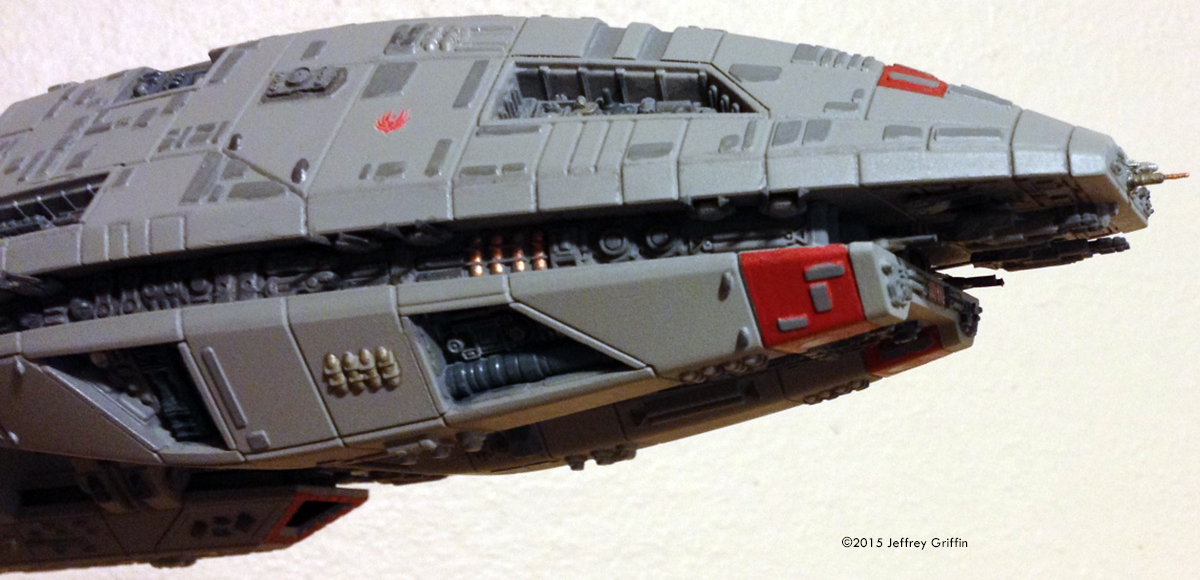
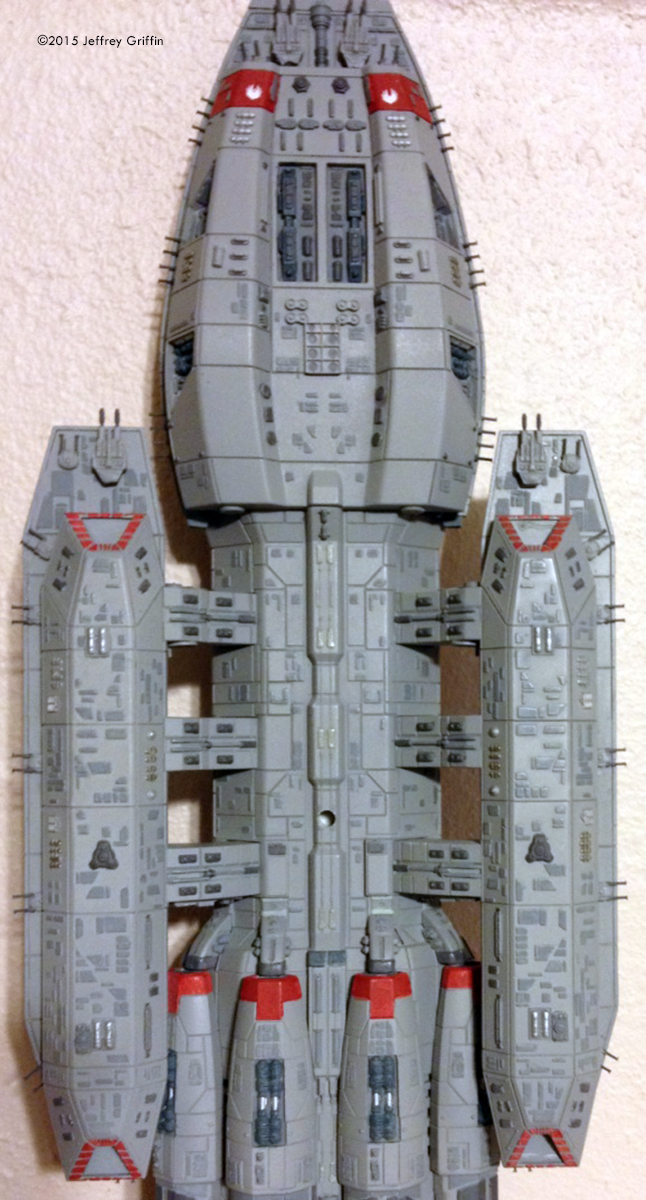
Details: Image: Starboard pod Image: Starboard bow Image: Topside Image: Underneath Image: Detail painting
^ Engine effects were done with paint
|
Not being inclined to have a "hero ship" from my first build, I've built my kit as the Battlestar Triton. After cleaning the parts with some some standard dish washing soap, I rinsed the parts, then cleaned them again with Scrubbing Bubbles� to make sure that any mold release was well and truly gone from the models surface. I then very thoroughly washed the parts again with a dishwashing detergent and then rinsed them in warm water. Afterward, I allowed the parts to air dry for about an hour, dabbing what little water remained with a paper towel. Just a very little bit of Xacto use with a new, sharp blade and and a little bit of sanding was required to remove stub seams. What little bit in the way of mold seams that existed where easily removed in the same fashion. I found all parts to be present and there were no voids or other molding imperfections in my parts that I could find. I dry fitted all parts after cleaning them, working in sub-assemblies per the instructions. Some minor alteration of the mounting area for the "gator head" - specifically the way the parts are meant to mount from the "neck" on the main hull to which the command section mounts - was required. This was mostly because I wanted to add the gator head as one complete assembly, which per the instructions you have to do them as adjacent sub-assemblies w/the upper and lower main hull pieces. I removed the lower tab that's a part of the main lower hull section, though left roughly 1/64-ish of an inch to act as a sort of alignment tab, instead of a full-on placement tab. This allowed me to add the parts as sub-assemblies instead of in a semi-awkward fashion, as well as allowed for a slightly tighter fit than I might have otherwise gotten. Instead of following the directions explicitly - as I should have with this build - and primered the Flight pod parts, painted and then added the decals prior to assembling them, I just built the Flight Pods as one complete assembly. Mea culpa and I'll definitely following the instructions on my next build. First, I primered all the parts. I then removed the name and registry "plates" from each of the upper flight pod parts, being as careful as I could with an Xacto and sand paper to not remove additional detail. I failed, though, as I later found out once the base coat was put on the model. I should have used a chisel-headed blade. Even the primer coat didn't show those particular imperfections. I replaced the name Pegasus with the brass PhotoEtch nameplate of Triton from the ParaGrafix Modeling System Battlestar Galactica Photo Etch and Decal Set for the "old" New Galactica kit. The brass PE parts went on very nice and smooth with some regular Superglue Gel. Also, the registry number that I chose wasn't "canon", either. Oh, well. The next move I made was to alter some of the detail on each side of the gator head, adding a resin-cast part from Marko Osterholz's TOS Battlestar Accurizing Kit, which was produced and sold through ARVEY Model Products. They're parts that I call "communications antennas" and they're at a number of locations on the TOS Galactica. I also added these parts to four other locations on the model, as well as several other bits and pieces of resin and some other kit parts from a variety of sources, to include a couple of other parts from the AMP accurizing set. I had intended to add a lot of additional detail to each of the arms, but eventually gave up because I my AMS was kicking in and I was taking waaay too long to pick which parts would go where. I also used an electronics connecting pin on one of the small nose antennas, to give Triton a slightly longer "snout". After I had decided that I had added enough of the pieces/parts, I puttied a couple of spots where I felt that the model needed it, mainly along the seam lines and a few join areas. I made another mistake not long after this point, tho, as I realized that I had failed to add the FTL drive part to the aft engine section. As such, I had to pop the seam, glue the FTL part in and reglue the model. I never got the seam back to as nice as it was before. Defintely learned that particular lesson - again! - about reading through the instructions at least one time before you decide to disregard them. Once this was done, I re-primered the sub-assemblies, making sure that I had cleaned up the putty and glue as best I could in most areas. Remember, I wasn't looking to build a Gold Caliber show piece, just finish the danged thing! Part of the primering at this stage was to paint the BFG rail guns, as well as a couple of resin-cast "Mega-Big Frakkin' Guns" to represent the "Block II" Mercury-class that Triton was meant to be - a Cylon Basestar killer. |
|
For the base coat, I chose Tamiya rattle-bomb AS-7, Neutral Gray (USAAF). It's a dark enough gray and of what I feel is a sufficent shade and coloration to give use the look we want of "Metallic Gray" without actually being a metallic color. Most of the builds of battlestars that I've seen over the last two or three years have been metallics painted in such a fashion as to make the model look toy-like. I feel that the AS-7 color gives the same basic on-screen look without really having to be a metallic paint. I also painted all of the BFG's and MBFG's the base coat. I got to thinking that it might be different to paint the raised hull plates that dot the surface of the main hull plates a different color. I had seen pics of a build from WonderFest this year where someone went with a much lighter coloration for similar raised panels and really didn't like it, so I went darker. I chose Tamiya XF-53 in the bottle, hand painting the details - and did all of the details on the hull by hand! - as carefully as I could, cleaning up excess paint with a toothpick. I didn't mask off all of these raised panels, as it would've simply taken way, way too much time and energy. And remember, the goal was to finish sometime this year. While I didn't mask much on the painting of this model, I did mask off all of the hull stripes that I painted Tmaiya Flat Red XF-7 with the exception of the areas around the flight decks. I also added some red striping to areas that aren't painted on Pegasus, namely on the underside "chin" of the head and at the openings to each of the engines. I was inspired to add the additional red markings to the engines by the build by the builder with the username of "Thom" at the Starship Modeler forums on his "Alternate Galactica" build, in which he used a Pegasus kit to represent his vision of what the Galactica woulda/coulda/shoulda been in the re-imagined series. I liked how that looked on his build, so stole his idea for mine, and expounded a bit by adding the red to the underside of the chin. |
![[Please click to enlarge]](jg_pegasus_Triton-51.jpg)
|
For additional detail paint, I used Tamiya XF-24 Dark Grey for the really dark areas, the XF-53 was used in the "trench" areas to help bring out some of the detail there, as well as Testors metallics of Aluminum, Steel, Copper and Jet Exhaust. I also used Tamiya XF-18 Medium Blue in a couple of areas, namely some of the engine details. One of the things I didn't think about at the time was that I should have pre-shaded the panels of the main hull. On the CGI model images, that's a fairly good sized gap area, being several meters across and where the Anti-Aircraft "flak cannons" are supposed to reside on this ship design. What I ended up doing was multiple heavily thinned washes of Tamiya XF-1 Flat Black, wiping down the exterior areas with a damp papertowel to get excess wash off the surface. I also painated the engine clear parts Testors Gloss White, let it cure, then put Tamiya Clear Blue over the gloss white to achieve an engine effect. The next step was to paint the name plate and registry number. I used slightly thinned down Testors Flat White 1168 applied as carefully as I could with a toothpick. I didn't think I'd be able to get the decals to set properly if I'd gone that route. It turned out alright, but not nearly as well as I'd hoped. I then applied Testors Model Master #1961 Lacquer Gloss Overcoat to the areas to which I planned to apply decals. I let it cure for about three hours, then checked to make sure it was good and cured - one of the great things about lacquer paints is that they tend to cure pretty quickly. I used Microscale MicroSet and water, as per usual, to get the decals - a sheet from J-BOT Decals - to a couple of specific areas. I used the large Phoenix emblem on the spine, per the standard. I also placed a small red Phoenix on each side of the head, as well as two white Phoenixes - Phoneixii? - to the bottom red chin stripes I'd painted previously. After allowing roughly two hours for the decals to fully set, I used Testors All Purose Dullcote Flat Clear Lacquer to see the decals, as well as to cover the rest of the hull and seal the paints beneath. It also sort of "blends" the other paints, making even the most uneven of colored surfaces look more natrual and uniform. Once all of that was done, I finally decided to go ahead and add the Flight Deck decals that I should've applied at the very beginning of construction. However, I only added them to the top flight decks. First there was the issue of puttying the square holes left by the insertion of the ships guns. You know the drill - putty & sand, putty & sand... Once that was done, I cleaned up the area well with some water and let it air dry. Next came the masking off the areas around the front openings to each upper flight deck with Tamiya masking tape and some papertowels. The papertowels were used to cover the surface of the model so that no primer or otherpaint might leak out. I then shot a based coat of Tamiya AS-7 Neutral Gray (USAAF) for the decking, followed by a gloss coat. I next trimmed the flight deck decals to fit and applied them. After sufficient drying time, I then shot some dullcote into the openings and all was good. This was a bit of a pain in the posterior, tho, as the rest of the model was already finished, so I had to be careful so as not to knock off the BFG's, MBFG's and the nose hair... er... antenna I'd added. You can view more images of the in-progress build at my Battlestar Triton PhotoBucket page. |
![[Please click to enlarge]](jg_pegasus_Triton-31.JPG)
|
Conclusions I'm very happy to own this and purchased two more not long after, two were from the Starship Modeler Store - where this model was purchased - and another from an individual. I look forward to this next build, as it, too, will be another non-hero ship - Atlantia, this time - so that I can practice scratchbuilding the flight deck interior, based off of screencaps I've pulled from watching "Razor" for the Pegasus bays and a number of different episodes for the Galactica bays. There's really not too much of a difference between the two bays, visually speaking, as they're both very similar in look. Plus, once the model is assembled, it's going to be hard to make out much detail inside, anyhow. I've already received custom decals from J-BOT which include the full flight deck markings decal, as well as exterior decals with metallic gold printed on them. This additional build is in anticipation of building a canon Pegasus that's worthy of entry at a model contest. I also have a Catalyst Creations Battlestar Pegasus Upgrade Set, which includes a ton of awesome details, to include very beautifully done connecting "arms" for the Flight pods, missing detail for the back of the gator head and replacement detail parts for the various trenches and other areas of the model. If you're a fan of Battlestar Galactica, as I am, this is definitely another one to add to your collection - or better yet, your model shelves! Just make sure you learn from my idiocy and follow the instructions - at least for the Flight Pod assembly, painting and decaling. This is an excellent addition to my growing Colonial Fleet! Many thanks to Moebius Models for bringing us these wonderful kits. And curse them for making me want to buy and build more than one! Now we just gotta get them to make some Cylon Basestars for Pegasus and Galactica to fight! |
Please note that the opinions expressed in this article are those of the reviewer.
Read other reader's reviews of this kit ![]() Submit your own review of this kit.
Submit your own review of this kit.
![]()
Go back up | Other Sci-Fi Index | Starship Modeler Home | Site Map | Feedback
This page copyright © 2012 Starship Modeler™. First posted on 12 January 2015.
![[Magic box]](jg_pegasus_MMPegasus01_lil.JPG)
![[Please click to enlarge]](jg_pegasus_Triton-28.JPG)

![[Please clcik to enlarge]](jg_pegasus_Triton-41.JPG)
![[Please clcik to enlarge]](jg_pegasus_Triton-49.jpg)
![[Please clcik to enlarge]](jg_pegasus_Triton-44.jpg)