|
|
|
|
By James Bryson - Copyright © 1999 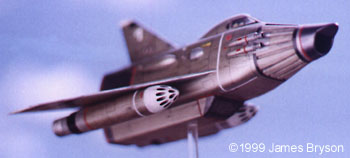
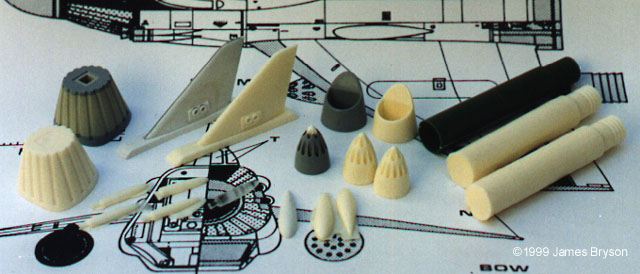
As a fan of Derek Meddings's design work on Gerry Anderson's productions, UFO in particular, I found Imai's kit of the submarine-launched jet fighter Sky 1 fell well short of the mark. The kit is based on the smallest stage model built for the show, which was around 25cm long, and formed part of the 75cm Skydiver model. There are inaccuracies even compared to this model which can only be fixed by scratchbuilding. As to my mind, the ?definitive? Sky 1 was the medium sized 50cm model (part of the largest Skydiver). I would try to match this version, instead. Although I didn?t realize it at first, it would require totally rebuilding the kit. I was working from videos, photos, and a copy of Bill Earle’s reasonably accurate blueprints in S.I.G. 16 (a British prozine from the mid-80s, covering Gerry Anderson productions), which I’d enlarged to the size of the kit. The most obviously inaccurate kit part was the nosecone, and to replace this I’d found a conical cake-decorating nozzle which was about the right angle, but the wrong sort of plastic, so I filled it with plaster to produce a ‘plug’ on which to heat-form ABS sheeting. The inside surfaces were made from sheet and epoxy putty. 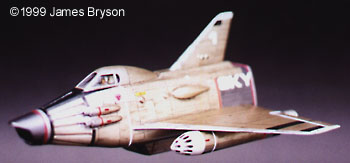 |
Click any of the smaller images to get a larger one.
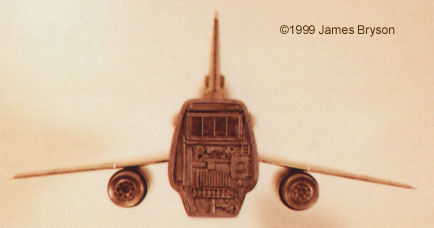
^ Some of the areas, like the nose and vertical stabilizer, were completely reworked and replaced with custom resin parts.
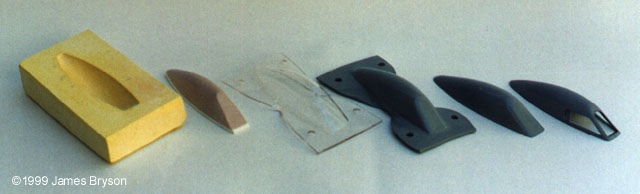
^ A view showing the extensive rework done on the nose and body.
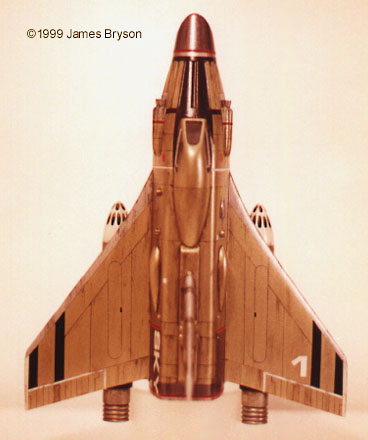
^ When all's said and done, this build up makes a convincing match for 50cm studio version, detail for detail'. |
| Of course, the new nosecone no longer fitted the grooved section from the kit, so this would need rebuilding as well. I made a cross-section to fit behind the nosecone, and another which would fit the fuselage. These were mounted the correct distance apart on square rod, with the space in between filled with putty and sanded to shape. I temporarily attached this to the fuselage, which had been strengthened internally with car filler. After correcting the fuselage as much as possible, I could remove the piece, and work the grooves into it with a small rat-tail file. The kit's bottom section, including the second air intake, was the wrong shape and included landing gear like training wheels. A replacement was built from plasticard, with the intake grill coming from the Tie Interceptor kit's solar panels. The recessed panel at the rear of the model was sheet plastic, the details made from Plastruct and kit parts, with the hatch/grill cut from the original kit panel. None of the studio models of Sky1 were built to this scale, so it was more for fun than for accuracy that I managed to work in some pieces from the Airfix Scammel Tank Transporter on the rear and sides, as this kit was heavily cannibalized for the original UFO models. I made the two teardrop fuel tanks by joining two pieces of plastic with double sided tape while working them to shape. This way I could directly compare them, and get them much closer to each other than otherwise possible. I turned a master for the four cannons below the cockpit windows, but had trouble casting such small pieces, and ended up turning all of them from perspex rod. As the rudder was flat but quite thick, I made it by laminating plasticard. The middle piece was grey ABS, which would give me a constant center line, with two sheets of white styrene either side. This was then filed and sanded to shape. Plastic and kit parts formed the rudder's side detail, which on the smallest original came from the Airfix Little Nellie Gyrocopter. The ridge the rudder sits on was added in plasticard. The plan was to make a single wing from sheet in the same way and cast two copies, but using solvent cement pulled the laminations out of line, and I reluctantly abandoned it. I went back to the kit wings, correcting them as much as possible, and filling the panel lines with green putty. |
|
^ The top view, showing some of the delicate weathering.
^ The underside of the reworked model, showing the revised "secondary intake".
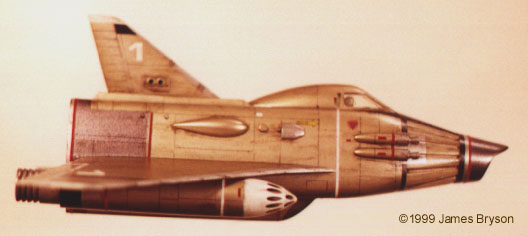
^ The left side of the vehicle, highlighting the meticulous finish matched to the 50cm studio miniature.
^ The underside of the reworked model, showing the revised "secondary intake".
^ The back side of the vehicle, showing the Skydiver docking surface. | Next the engines. Only the back half of each was the right shape, so after a bit of fiddling about and squaring off I put the two halves together to make one correct part, which I could mould and cast. I would rather have used stock plastic tube, but the importer here chooses not to bring the right size into New Zealand! The exhaust nozzle was about the only part which agreed with the plans, so it was added as is. The missile cones would also be cast from a single master. For this I made a plug in car filler, and heat-formed over it in ABS. The eighteen missile openings were carefully plotted and drilled into the plastic, which was then filled with epoxy putty and the holes redrilled to a uniform depth. The kit has no interior detail, so I made a simple cockpit from thin ABS and kit parts. A standard 72nd scale Airfix pilot was used as they have a spherical helmet like the ones on the show. The last components replaced were the cockpit canopy and windows. These were made by heatforming twice over a plug made from car filler, and I spent about four hours one afternoon sanding this down, doing test pulls in clear and then ABS sheet, and sanding down some more, until the final shape emerged. The window areas were carefully cut out of the ABS shell, which was primed and painted silver, placed over the clear shell, and glued in place. I could then mask the windows with liquid latex, along with the window frames on the ABS shell, which was both extra protection for the clear windows and would leave the frames the proper silver after painting. I pulled rubber moulds from the engine and missile-cone masters, casting the required parts in two-part urethane resin. Unpleasant stuff to work with, as it gives off cyanates as it cures, and even the dust from sanding it is bad for you, so I tried to work all the pieces in one go, cleaning and vacuuming often, to minimize exposure. The model was primed, and some final filling and shaping done. The engines were left off and painted separately, as coverage would have been difficult with them in place. The final color of the model had been on my mind from the start. Expert replica maker David Sissons mentioned in his Skydiver article that an English car color, Ford Oyster Gold Metallic, was a very close match to the original, so I flew to England and bought a can! O.K., so I was making the trip anyway, still, it was an opportunity not to be missed. Misguided soul that I am, however, and thinking that aerosols were only a problem in an unpressurized hold, I very politely asked at Customs if it was OK to have the spray can with me. No, it's not, sir. Please hand it over! I sat on the plane, surrounded by who knows how many cans of hairspray and deodorant, and liters of duty free flammable liquid, fuming at my own stupidity. I'd have kicked myself, but there wasn't the leg-room. I had the presence of mind to keep the top of the can, however, and was able to match it to a New Zealand car color when I got back. Interestingly, it turned out to be called Spectrum Gold. The model was top-coated, and the small areas of secondary color that distinguish Century 21 models added in spray lacquers and Humbrol enamels. The panel lines were drawn on in black ball-point pen. I had vinyl lettering cut for the word 'SKY', and the '1's, in the typeface Eurostyle Bold Extended. Red stripes were added in self-adhesive paper, painted with enamels. The white lines were unpainted paper, but I had to redo some of these after the weathering, as they soaked up the wash and looked absolutely filthy! I was keen to use pencil weathering on the model, as this was standard practice at Century 21, but it had trouble adhering to the semi-gloss finish, and even using a 4B, it looked a little too subtle. By dry-brushing a streak over a panel line, and then using a brush loaded with thinner to remove the streak forward of the line, I eventually built up some nice effects. Overall, I think I made it a little dirtier than it should be, but it's so easy to get carried away! |
| A few clear coats sealed everything on, the masking came off the windows, and the engines were finally attached. A stand was made from a stock base and clear rod. Sky1 looks great sitting on the TV, especially if you freeze frame UFO and compare it to the 'real thing'. My girlfriend likes it, although the pilot doesn't look enough like Peter Gordeno for her, and she passed judgement on the weathering by saying "It was nice when it was clean."( "..and that's when I shot her, your Honour."). She also asked me when I was going to make the 'back bit'. There's no pleasing some people... At some point on the journey to a complete model I realized I had replaced everything except the fuselage and wings, and these I had heavily modified. Only the fact that I started with a kit of Sky 1 and ended up with a model of Sky1 stops me from calling it scratchbuilt. A few inaccuracies had managed to creep through, some due to lack of reference, but mostly because to understand a shape in 3D you really need to build it. So, I learned a lot on the way, and continued to collect reference on the original models. Next time, bigger and better! Many thanks to Andrew for bringing the kit back from England when I couldn't find it here, Richard and Tania for materials and compliments, and especially Victoria, for endless patience and subtle hints... |
![]()
This page copyright © 1999 Starship Modeler™. Last updated on 14 April 1999.