
By Everett Soares - images & text © 2002
|
![[Click to enlarge]](es_logs_1.JPG) Journey back with me to a time when a group of space travelers crash-landed on an uncharted world. On a world of great danger, a world where life's simplest tasks could mean the end of our tiny heroes. Welcome to Irwin Allen's Land of The Giants. |
|
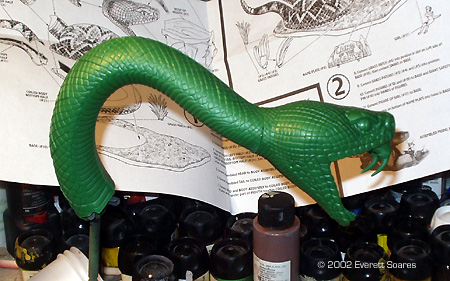
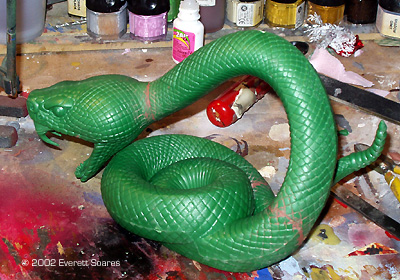
Image: Head and body coming together
Image: Every major join needed some putty and careful sanding Image: Smaller parts, primed
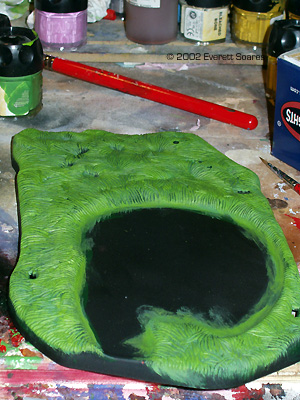
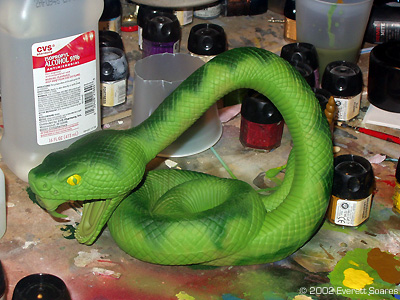
Image: Painting the base Image: The other side Image: Rear view, completed scene |
Well, that's how I remember it from the re-runs on the SCI-FI channel. Anyway, this review will cover the Polar Lights reissue of the Land of The Giants Snake Scene kit. Before I started building the kit I did a little research into some of the history that surrounded it. Aurora first created this kit back in 1969, and it had a good run for a while until they went out of business. Then some time went by and Polar Lights decided to reissue the lines of the classic kits, including the snake scene kit. However, there was a major problem. They needed to remake the molds from pictures and what few models are still surviving. This review is to see whether or not their hard work paid off. What Comes In the Box The box contains the ten major body parts that make up the snake part of this kit: the two halves of the lower body which makes up the base of the snake, the two halves of the upper neck, and the parts that form both sides of the head. The last grouping of parts forms the inner section of the snake's mouth. They include the upper pallet of the mouth, the lower part that makes up the jaw line, and two fangs that fit into the upper pallet of the mouth. The next grouping of parts makes up the base of the model. They include our three tiny heroes, a really nifty looking name plate, the oval flat base with detailed grass already molded into the base, five sprigs of grass (four parts are meant to be glued together to make up the two major sprigs, and the fifth one is casted in one solid part.) and the weapon of choice, the safety pin. All parts are colored in green plastic. Prep Work Ok, after breaking the seal on the box of the kit and getting a good smell of the new plastic model, oh come on we all do it. We just don't let our wives catch us doing it. The parts received a good bath in Windex and dish soap, and soaked overnight. The very next morning I gave the parts a good scrub, and quick patting with a paper towel to speed up the drying time. The Horror, The Horror, or Acts Of Dog I started to clean the model lines from the parts as they were taken off the sprues. The bad news is you have to keep a good watch for these mold lines; they are on every part. But, the good news is that they are not thick and heavy. They are easily taken care of with a sharp knife and a good eye. With the body of the snake and grass sprigs out of the way, I started on our three heroes. There are some mold lines on them that can be taken care of, but you have to be very careful with taking the lines off. One wrong scrape and what little detail you have on their faces and their hair is going to disappear. Ok, quick parts check. The solid one-piece sprig of grass was missing, and the dog was nowhere to be found. Hmm, what could this mean? It meant I got to crawl under the bed and wrestle the part out of the dog's mouth. ICK!!!! Well that part was chewed beyond use. What could be done to save the review? I sprang into action and gave a call to Playing Mantis (A.K.A Polar Lights) to tell them what had happened. They were very friendly and helpful. They were able to send a new part to me in no time flat. I love good customer service. Getting It Together With new part in hand, and the dog locked in the bathroom (I left the toilet seat up), I started to dry fit the parts. The first order business was to get the snake put together. I had made the decision to treat the snake and the base of the scene as two separate models. I started to assemble the roof and bottom of the mouth and fitted the fangs in. No problem there. The two sides of the head also fit well. The mouth part fitted between the two sides quite well, but with the parts put together there was a very noticeable seam lime that formed, and ran down the back of the head. To correct this I lightly sanded with very fine sand paper and used very light putty. The neck part and the main body part went together with little trouble, after widening the holds with my knife. However, the seam problem repeated it self on these parts as well. I glued down what I could, then lightly filled the wider gaps that I found. The putty I like to use is two-part plumbers putty. The reason is that it does not harm the plastic and sands smooth with lighter grit sandpaper. The trick to working with this putty is to soak it in a little water after you mix it. With the seams filled, I tried to lightly sand the rough spots to give it a smooth look. You need to be careful around some of the scales; if you sand too hard there is a chance you can lose the detail that is there. With the body parts together, the snake was placed aside until the base was dry-fitted. On To The Cast and Crew Our cast of heroes consists of three small figures, two males and one female that appears that she is in danger. There is no assembly needed for them. The only work that needed to be done was cleaning the mold lines off, and dry fitting them to the oval base. The sign needed a few adjustments to the peg holds in the base. The holds can be either drilled out with a pin vice, or a very steady hand with a sharp hobby knife. This Show Brought To You In Living Color With each part dusted off I started the painting of the parts. All parts started with a base coat of mat black primer. The base and the three grass sprigs were given a dry brush of dark green. When those colors dried, the next colors were added - a dry brush of light green was applied, and a very light dry brush of yellow was added. The oval base received the same colors and washes that the grass sprigs were done in. |
|
Our heroes were next up. Each one is painted with the closest color that matched the painting guide in the instructions. Figure one's jump suit was given a coat of dark red, and his hair was painted brown with lighter brown wash. His skin was given a coat of light flesh paint. Figure two's jump suit was given a light gray coat. His hair was kept black, and a dark brown skin tone was used for his face and hands. Our female in distress was given a dark blue coat for her jump suit and a pale skin tone for her face. Each figure has very little detail on their faces. This makes it a little difficult for the paint to grab hold. The safety pin was the last part to paint in this grouping. It was not that difficult since the pin was painted in dark metal, and then a rust wash was applied to give it a weathered feeling. With the base coat dried on the snake, I gave it a second layer of light green primer. When the green primer was ready, I loaded up my airbrush with a darker green color. I lightly brushed the back of the snake to bring out the raised details, and back of the head over the eyes to give some contrast between the two colors. The next step was the eyes. I decided to put away my airbrush and started work with a brush. A base color of yellow was brushed on with a standard paintbrush for the pupil. The iris was painted black. For the inner mouth I mixed some dark red with enough white to get the right pink need for the gum line. With the gum out the way the fangs and lower teeth received a coat of dark brown. When the gum line was ready I very lightly dried brushed with flat white. The final touch for the mouth was to give the teeth the bone color, which was done with a coat of bleach bone white. The last part of the snake was the rattle. I decided to use two different browns to separate the rings on it. The paint brushed on smooth and touch ups were light. At last, the final part, the nifty sign plate. With trusty paintbrush in hand, the letters were painted in dark red. The mountain background was painted in a dark gray. The shadow figures were touched up in mat black. The Final Gathering After all of the parts dried, I started on the final assembly. The tiny heroes went on first. This was made easy by the footprints that are molded into the oval base. The safety pin was then glued in place, and then the sign plate. The snake was placed into position, so that it looks like it is going to eat someone's head. Final Thoughts I like the kit. It is a good place to start off with if you are a new to modeling. However, the model does have a few flaws that I would like to see corrected somehow. The oval could be longer. When I placed the snake on the base it comes too close to the group of figures. This could be corrected by changing the angle of the snake's neck, but you would need to cut, file, and use quite a bit of putty for this correction. The figures are small and do not have a lot of detail to their faces, but they are not the main focus of the kit. The extra detail could just help in the painting of them. The main body of the snake has some fit problems, however with widening the holes in the body parts seem to correct this. What cannot be corrected by widening the holes, you will need to use putty, but you have to be careful on the amount of putty used. With these flaws corrected, you could end with a nice model. I recommend this kit to beginners. It provides enough practice for puttying, and one more skilled in detailing than I can really make this kit shine for Wonderfest. Many thanks to the good folks at Polar Lights for providing the review sample. Manufacturers and retailers, interested in getting your wares reviewed and publicized on a site averaging 3500+ readers a day? Contact us! |
|
![]()
This page copyright © 2002 Starship Modeler™. Last updated on 25 November 2002.
![[Click to enlarge]](es_logs_2.JPG)
![[Getting started]](es_logs_8_.JPG)
![[Putty]](es_logs_12_.JPG)
![[Figures]](es_logs_19.JPG)
![[Click to enlarge]](es_logs_49.JPG)
![[Click to enlarge]](es_logs_50.JPG)
![[Click to enlarge]](es_logs_3.JPG)