
| By Chris Lemke - images & text © 2007 | ![[Please click to enlarge]](cs_vf_complete.jpg) "On this first day of a new century we humbly beg forgiveness and dedicate these last forests of our once beautiful nation to the hope that they will one day return and grace our foul Earth. Until that day may God bless these gardens and the brave men who care for them."--President Anderson of the United States |
|
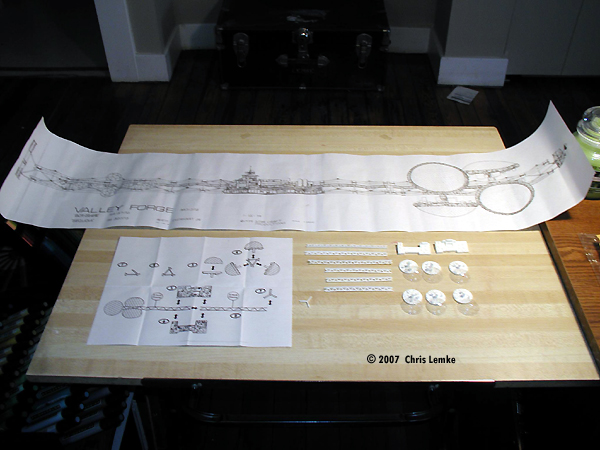
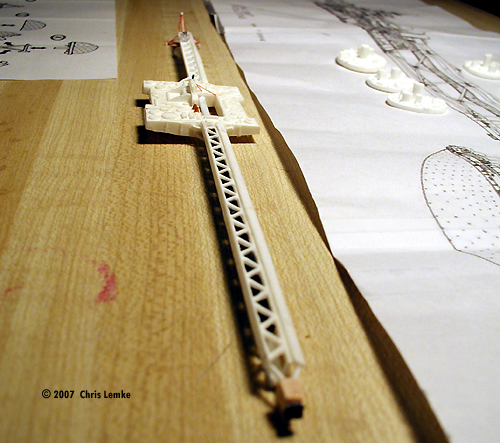
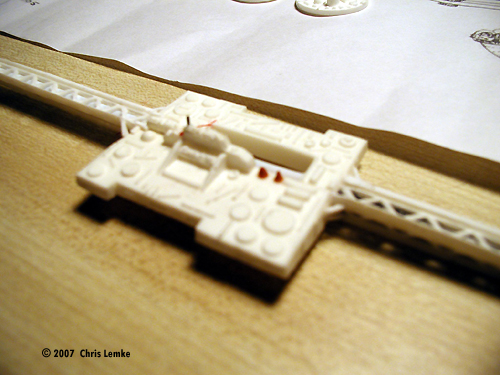
Image: The plans I downloaded were a lifesaver... Image: ... because the instructions aren't overly helpfull Image: Detailing one end Image: And the other Image: Basic framework built Image: Adding details Image: More
Image: Side view |
From the film Silent Running, the Valley Forge is one of three cargo vessels (Valley Forge, Sequoia, and Berkshire) orbiting our sun near Saturn. Each ship carries six domes housing biospheres representing what is left of our national forests. This movie and ship has been a favorite of mine since the first time I saw it. I've been planning to do a scratch build of the ship as I had never seen it as a kit; so you can imagine how excited I was when I came across the Valley Forge as a kit on e-bay. I couldn't resist. So let's get started! What You Get The kit is a made of a soft resin and comes in 24 parts:
The parts have a fair amount of detail but it's mostly add-hoc not really following any of the images of the movie ship. For example, the hull pieces have detailing only on the top side, and there is some detail added in but it does not match any image if the ship other than the shape of the hull itself. The latticework beams have almost no detail and are missing most of the support structure. I believe this is to be an allowance for the size of the kit (10 inches). A small propeller-like piece is provided for the aft solar panel/engine pod. The dome bases and domes are, in contrast, nicely done. Thought the detailing on the underside of the bases is again a bit generic it follows images of the film ship slightly closer making an attempt to give the “feeling” of the film's ship. The geodesic domes are very nice, quite clear and molded with “facets” to simulate the wire work of the film model. The kit has three small (3mm) wooden beads that are meant to be the fuel cells that are on the aft of the ship, but the forward radar/com array is not included in the kit. Nether is the com array for the ship's hull. Building The instructions are very straightforward and not very helpful, so I went out to find my own recourses. I found this website which had these plans. With these plans and the images on Starship Modeler I had plenty of references to with. |
|
My first step was clean-up: a LOT of file work on the latticework structures, some pit filling on the underside of the superstructure pieces and a little fill work on the dome bases. I made 2 primary changes to its kit. First, I purchased four 3mm faceted clear beads for a local craft store to match the fuel cells a bit closer. And I added the central “tube” inside the latticework frame. The frame is meant to fit together edge to edge and attach to the 2 halves of the superstructure but it fails to fit, and there is no support for either the aft or forward frame work. To counter this I cut the beam from the bottom edge of each piece and attached them around a micro-dowel that I was using to fill in for the missing main tunnel. This served to create a “backbone” for the frame work and the superstructure, as well as allowing me to add the missing central tunnel that is seen to run the length of the ship. I used a heavy gage wire fit into the hole of the bead that is inside the aft frame. This supports the solar panels away form the framework as in the plans. Once the panels were connected I needed to dress them up a bit so I used some if the scraps I cut from the frame to make the engine pods on the ends of the panels. Next I used thread to simulate the support beams that attached the panels to the aft of the frame. Next was the missing forward com array. Here I again used scraps from the frame cut-away; some carved bass wood and a bisected bead. I didn't manage the effect I was looking for, but it works for now. The superstructure was not well fitted at all and required some real work with file and filler to make the ends match up. In the end I added a few greebles to cover the mismatch. I added some support beams with thread and scraps. I added some detailing to the underside but not much as the underside would not be very visible with the base I had planned. Once I completed the work on the superstructure I drilled the support holes to connect to the base. Painting and Finishing Paint was easy. There was no reference in the instructions for colors but I own the film and there are plenty of photos on the internet. I added a slight black ink wash over all the white pieces to bring out any details and give the ship a “used” look. The domes were the most fun. I couldn't just leave them empty as these domes were the focus point of the film. So I used some super-sculpt to create a very slight landscape, then I attached model railroad “tree flock” to simulate the forests inside the domes. One dome on the Valley Forge is a desert “forest” with a walkway around and through the landscape, so again I built up the lad with the super-sculpt and used printer paper cut into strips to make the walkways. The domes attach easily onto the framework and are very stable once connected. The base was built from basswood sheets cut at an angle to create a name plate. The Valley Forge is supported by 2 micro-dowel rods set into holes drilled into the base. Due to the weight of the domes on the forward end of the ship I added a stack of pennies glued together as a counterweight and hid it behind the name plate. I printed the name plate on card stock paper using images and text found on the internet. Overall Over all I'm happy with the way this kit turned out, and I consider it a good study for the scratchbuild of the Valley Forge I've been planning. |
![]()
This page copyright © 2007 Starship Modeler™. First posted on 7 June 2007.
![[Please click to enlarge]](cs_vf_parts.jpg)
![[Please click to enlarge]](cs_vf_major_assys.jpg)
![[Please click to enlarge]](cs_vf_top.jpg)