 |
|
|
By Vince Hoffman Images and text © 1999.
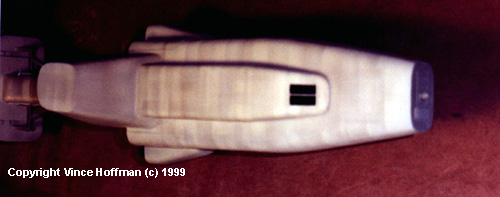
![[Beauty, ain't she?]](vh_lex1.gif) The EAS Lexington, commanded by John Sheridan after the death of her capitan, destroyed the Minbari flagship 'Dark Star' during the Earth Minbari war. After drooling over the Earth Alliance Cruiser in Babylon 5 for nearly 3 years, I decided to take the plunge and build one of my own. The model is 32" long and completely scratchbuilt. |
|
|
The model was built in 3 sub-assemblies, the foreward hull, hanger section and engine section. The main hull in front was carved from balsa wood because it was too large to fit on my vacuum former. The towers, upper and lower hull protrusions and the hanger were all vacuum formed using .020 plastic. The towers were reinforced on the inside with extra card plastic. The engine section, reactor section behind the hanger, and the structure behind the tower were built up from .030 plastic. These items could not be vacuum formed because they provide structural integrity to the model. The trusses were built up using Evergreen plastic shapes and painted before installation because of all the inside corners. These pieces must fit perfectly because they support the weight of the rear half of the model. After each assembly was completed they were dry fitted to each other and checked for fit and alignment then shimmed and sanded until everything was nice and straight. At this point the model was mounted on a 12" X 3' board which eventually became the display base. The engine parts were cast in resin. The engine bell is a 2 part mold. The engine was created using the main casting with a second piece applied to the front to make the straightened exhaust. The smaller nozzles went on the rear section of the main hull. The saucer shaped part off the tower is a mystery. I believe it is the bridge, but speculation aside... it was created with 2 parts, the first part is a 2 step casting, the top textured area was cast separately, sanded and shaped to the right size, then the dome was cast around it. I had very good results with this process. The top and bottom are attached using a small strip of plastic to create the recessed slot around the circumference. |
^ Three views of the completed model.
^ The basic hull, built up from basswood and vacuformed plastic. |
|
^ The engine bells. The molds are shown on the right.
^ The hangar bay assembly connecting the fore and aft sections.
^ Painting using flexible paper masks.
^ Blue stripes done, it's time for decals.
^ Close-up of the bow, showing all the antennae and gun turrets to good effect.
^ Window decals. |
Construction of the gun turrets was a 4 step process... first, the basic half-circle shape was cast in resin and the bottom ring and top gun base was added using plastic strip. Then the whole thing was cast again to make a second master. More than 10 of these were created before I found 5 that were perfect (the others go in my greebles box). The guns were then built up using tube and strip plastic. The fourth step was to make the arched pieces on either side of the gun. This shape had me stumped for a while and I almost gave in to just painting them onto the turrets. They were created by using the original master glued to the end of a brass rod and pressing it into a piece of heated styrene. this gave me a perfectly shaped piece of plastic that would fit the compound curve of the turret exactly and was the perfect thickness. I then carved out 2 pieces, chose the best one and cast it in resin 10 times, 2 for each turret. Painting the model was a chore since most of it had to be assembled before painting was started. First, all parts were temporarily glued on and any fit problems were taken care of. All the details such as the turrets, bridge assembly, and engines were left off since they would be painted separately. First, the whole model was given an overall coat flat black enamel paint. This black undercoating would allow me to bypass using a dark wash later by creating recessed shadows in the light grey paint that was to come. Light grey paint was chosen as the primary hull color, and airbrushed over the surface of each hull piece according to which direction the panel lines were going to go. This created light stripes which was the first step in creating the complex pattern of panels. Next, a slightly darker shade of grey was mixed using the original grey as a base and used to highlight the myriad panel lines. The panels were masked by using my flexible mask technique outlined in the tips and techniques section of this website. Multiple passes were made using these masks. After the panels were done, all trusses were painted dark grey and smaller hull details were painted. The model was then set for several days to allow the paint to cure. Then all of the blue stripes were masked using low tack drafting tape. Medium blue paint was used for all the stripes with a very dark grey around the nose. At this point all the painting was done and the whole model was oversprayed with acrylic gloss to help the decals to adhere. I made decals for the ship's identification markings, Earth Alliance logo, and windows. The decals were made using Print Shop and printed using 720 dpi at twice the scale then reduced on a color copier to create very crisp lines and colors at a small scale. It took me several trips to the copy shop to get the decals perfect. This model was started in August 1998 and finished February 26, 1999 with a 2 month haitus around Christmas (whew). My thanks to Jack Wendt for his help on vacuum forming, Brian Dainty for his tips on resin casting, and my wife for her atomic clock precision with the 'on-off' switch on the vacuum former. Now, where do I put this thing ? |
![]()
This page copyright © 1997-9 Starship Modeler™.
Last updated on 18 April 1999.
![[Close-up of the bow]](vh_lexb.jpg)
![[Obliqe forward view]](vh_lexc.jpg)
![[Rear view]](vh_lexd.jpg)

![[Engine molds]](vh_lexe.JPG)
![[Hangar assembly]](vh_lexj.jpg)
![[Masking & painting]](vh_lexm.jpg)
![[Before decals]](vh_lexo.jpg)
![[Bow]](vh_lexp.jpg)
![[Windows]](vh_lexde.jpg)