
|
|
|
|
This review courtesy of Kip Hart - © 1997 Until the Revell-Monogram kits start coming out, there just aren't any decent sized, licensed kits of B5 ships available. What's a modeler to do? If you're like Kip Hart, you take matters into your own hands. Here he tells how he built a Shadow 'Batlecrab' from scratch - using balsa, resin, and a host of ingenious, but simple, techniques. |
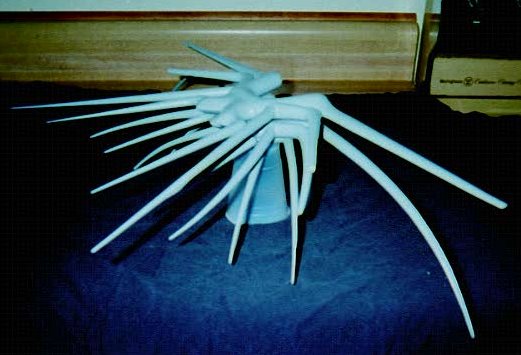
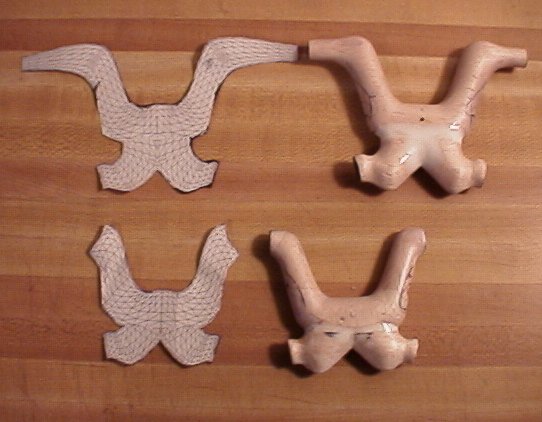
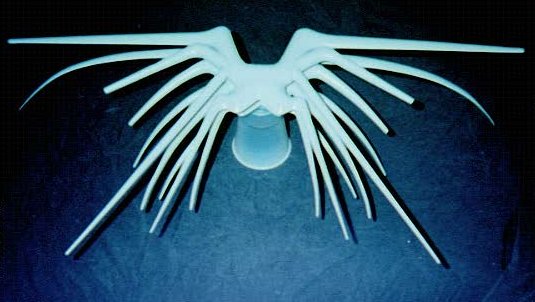 All images courtesy and © 1997Kip Hart. Another view of the unpainted model Upper and lower body, with computer-made templates  Mold halves for body parts 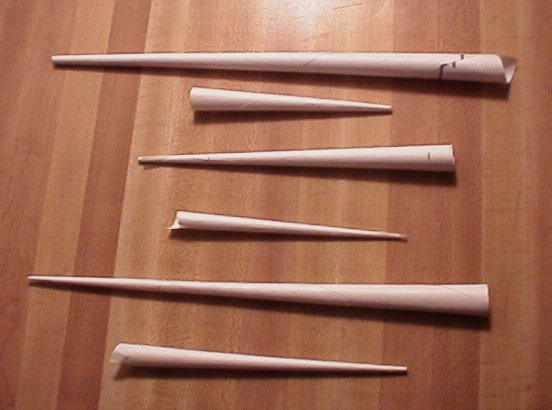 Spines, fresh from the mold |
For starters, I sat and watched a great deal of the show to gather refernces for an accurate bunch of drawings. I put everything into my computer to make some printouts of the outlines of the upper and lower main body parts as well as the whole ship. Because I wanted to make more than one ship, I decided to make molds and cast the various pieces from resin. The basic body was carved from balsa wood blocks. (I find balsa easy to work with and very forgiving). Since they were not going to be the final product I was not worried about perfection, just getting the basic shapes right. When I got close to what I wanted I gave each piece a good coat of sealer, then sanded them smooth. I then made molds of the body pieces using RTV rubber. From the RTV molds I cast the parts in Por-A-Kast resin. I never tried this stuff before and must say I loved it! Very easy to work with and quick setting. After sanding down the upper and lower sections I turned my attention to the " spines ". I'll tell you, there are NO places out there I could find that sold shafts of plastic or whatever that were a specific length and tapered slowly to and end. If you find such a place you are better than I... So, I was back to trying to make something from scratch again. The easiest, not to mention cheapest, way to do this I found was to just take ordinary printer paper and roll it up to the desired size and length. A hole gage is very useful here (one can use an inexpensive draftsman's circle template - a thin plastic sheet with various sized holes cut out - for this --Ed.). I had make the "spines" a little longer than necessary for the next phase. |
|
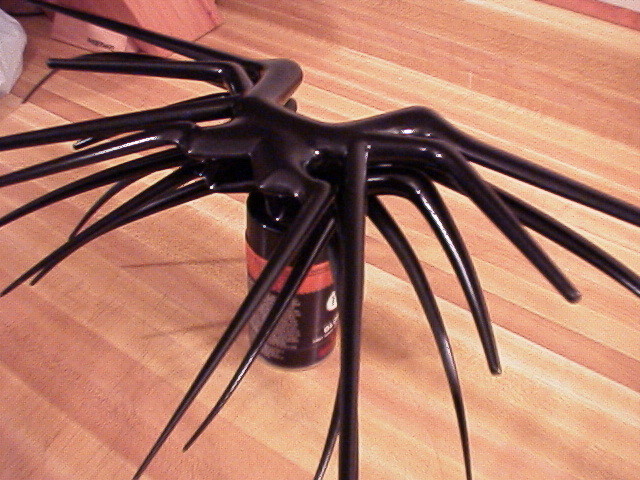
Since I couldn't obviously cut, glue, or sand the paper to the upper and lower halves of the body I came up with another idea. I took a sheet of heavy duty aluminum foil and rolled it around the spines. It sounds dumb but I had a brainstorm : Instead of using expensive RTV rubber for all the molds how about something cheaper ??? Foil was my answer. When I got the foil wrapped around each " spine " about ten times (sorta' tricky to do right the first time) I carefully pulled out each paper "spine" from it's "mold" . Wrapped this way the foil was very rigid and held its shape for the next phase. Since some of the "spines" are oval shaped and some round I needed to duplicate this as well. So, I laid the one's down that needed to be oval and took a level to them and slowly pushed down on the length of the foil "mold". With practice I found I could control the degree of the size of the oval that I needed by how far down I pushed the level onto the foil. Now it was time to cast the spines. I taped each one to a dowel inserted into a piece of scrap wood to hold them upright. I slowly poured the resin into each one. When they all cooled a slowly unwrapped the foil and voila- perfect spines. Since I needed a matching one for each side I just repeated the process . When each set was done I just sanded them down to almost matching each other and went about attaching them to the upper body. For the lower section I did pretty much the same thing except that the lower section's spines were all curved. As it turned out the heat produced from the chemical reaction of being in the foil worked out to my advantage. Working with one spine at a time I poured the resin and waited till it just set up. I would then unroll the foil and since it had not set yet it was very flexible. I could then bend it over a pre-cut form to the desired curve and tape it into place till the resin cured completely. When it came to attaching the spines to the main body I fell back on my computer print outs. It's a lot easier to get all those angles right if you have a template to work with, believe me! When it came to the bottom section I did it pretty much the same way as the two upper sections. |
|
The final thing to be done was the organic " skin " of the ship. I suppose I could have just painted it black and been done with it, but that seemed like a bit of a cop-out after all the previous effort. The problem was HOW to get that look of the skin? After a lot of trial and error I finally found something pretty close. At first, I tried making a mask from clear contact paper. This didn't give me the effect I was looking for though. Then I had a brainstorm from my R-C Modeling days. I remembered I used to fill in depressions on the models with MicroBallons, and if I used A LOT of glue I would create a "high-spot" on the model that needed to be sanded down. Well, as fate would have it that " high-spot " was JUST the effect I wanted to create for the " skin " of the ship to replicate the " veins " you see sticking up. So, I went to a local hobby shop and bought a small applicator with a fine spout on it, then I looked for a thick glue. Elmer's wood glue worked very nicely as it had a nice thick consistancy. When I filled the applicator with the glue I went about the VERY long process of slowly squeezing the glue in a thin stream over the body of the ship. The idea was to create a pattern of triangles and octagons and join them together. After awhile I got the hang of it and created more "flowing" types of patterns. As each new section was drawn on to the body I sprinkled on the MicroBallons to make a "high-spot" on the ship. I then let it dry awhile before blowing off any excess MicroBallons So I could use them later), and continued on to another part. It took a few day's to cover the entire ship, but I think it was worth it as the effect is much closer to the appearance of the raised veins of the organic "skin". How close it is is up to folk's like you to tell me! |
 Painted, assembled ship before the 'veins' were drawn 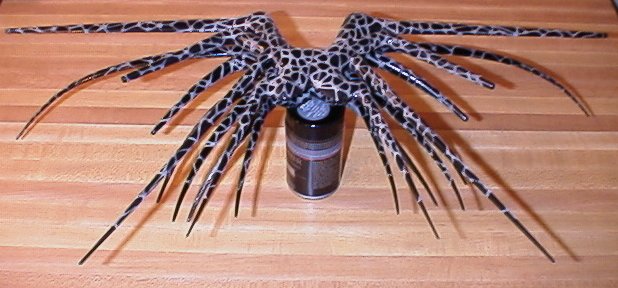 After the 'veins' were drawn Close-up of the new 'veins' |
|
The only thing left to do is make the final molds of the model and I'll have my finished Battlecrab from them. Since I wanted more than just ONE Battlecrab when I originally started this project I went "the long way around the barn" with its construction. I suppose you could find many ways to shorten up the project, but then you would have no molds to cast more ships from if you did - and what I have learned from the "Battlecrab" construction will help me greatly in the construction of the Vorlon transport, which is next..... |

| BABYLON 5, the Babylon 5 logo, all photos and images, and related indicia from the series are copyright and trademark 1992-1997, PTEN Consortium. |
This page copyright © 1997-9 Starship Modeler™. Last updated on 21 April 1998