|
|
|
| By Donald Hayunga Copyright © 1999. |
|
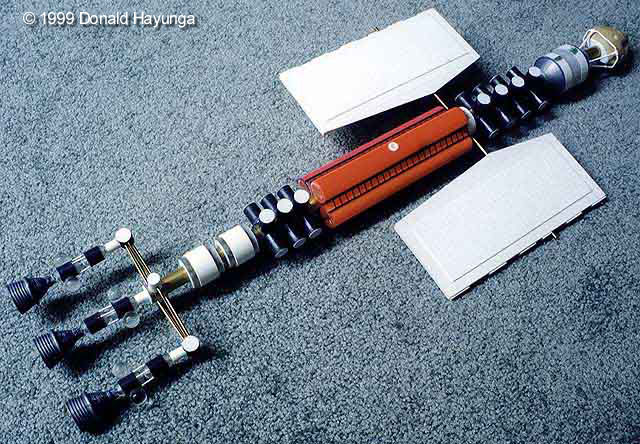
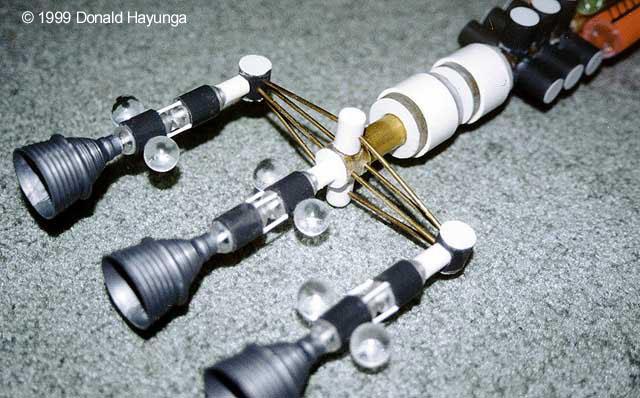
In 1997, I joined the Space:1999 Mailing List. It was during the exchange of e-mail that my friend John Fleming suggested I get ahold of Jim Small who was into modelling. That eventually led to a friendship and my commissioning Jim to build me a copy of his 24-inch Ultra-Probe model. We also began to create a list of 1999-related things I wanted him to build in scale with the 11-inch Eagle model. This wish list included the "Meta Probe". After some lengthy discussions, Jim was able to convince me that I should make an attempt to scratch build the Meta myself. At first, I wasn't sure I could do it, but with Jim's ongoing encouragement, I decided to try. My research into the construction began by bugging Jim for any photos he had. He supplied me with two monochrome images (the only two photos in existence that I know of ). Neither show the Meta Probe in its full length. Next, we brainstormed as to what materials I would use. Jim made a drawing of the model, hypothesizing sizes and lengths of various sections. Worried about the high cost of this project could demand, I was determined to find supplies cheaply. I began by visiting local hardware stores and supermarkets in search of materials. The first suitable item I found was a child's toy consisting of six partially sand-filled tubes used to practice pool diving. These tubes (four in all) now run parallel to the center shaft of the miniature. The design of the Meta Probe features "dished" caps at the ends of the long tubes on the main body. On the ends of each of these tubes are my other inexpensive design solution discoveries-as it turns out, the small finishing caps that fit into most hot and cold water taps to tell you which is which (hot and cold) are near perfect. A small amount of sanding and this part of the model is complete. Next, an order to Plastruct, in California. They carry a wide assortment of plastic shapes that are precision molded for engineering dioramas (the kind that are not generally available at your local hobby store). The bulk of the required tubing was ordered from Plastruct, as well as some parts needed for the engines. Next I stopped by my local hobby store to purchase three brass tubes. Two are larger than the third so that the larger two fit over the smaller diameter tube. At this point, these tubes are cemented end to end. I must say that the greatest hassle in the process was the cutting of the 28 little cans that populate the spine areas of the model. It was at this time that I realized the importance of proper tools. My next stop was the hardware store. Construction of the largest of the main body parts was simple. Jim suggested using two cone pieces from a 1/48th scale Apollo Saturn V kit which he supplied to me. The two cones are glued to an old pill bottle cut down to size. At this point several of the main body parts began to take shape. One problem was the fitting of an Airfix 11-inch Eagle nose cone to the main body. This obstacle was solved when Jim provided me with a nose cone that had the hollow opening at the back filled in. I then drilled a hole into the back of the filled nose cone and inserted a short piece of brass pipe; this in turn fits inside the brass main body. Next I had to create a girder like effect around the nose cone. The girder effect was created using "Snap-Tees" and plastic-coated wire. With all the main body parts finished I began to assemble the three main engines. The rocket bells are from the above-mentioned Saturn V kit. I decided on these particular rocket bells because of their large size. I removed the excess plastic, leaving just the bells. Jim and I discussed the idea of using Eagle engine bells but this meant the sacrifice of an entire Eagle kit, since the Eagle kits were still unavailable at that time and/or very expensive, we felt that using the Saturn V engines was a better idea. The final job in the construction was the creation of the two large solar panels that mount to a thick piece of wire. The panels had to be very light so as not to bend down under their own weight with the passage of time. These panels are constructed of square plastic tube and scribed sheet plastic The solar panel mounting rod is solid from outside edge to outside edge. It passes through one panel, and then a thick collar made of plastic, through the brass tube at the center of the main body, and then back out through the plastic collar to the second panel. I was now in the assembly phase of the project. Without gluing anything, I began to arrange each of the pieces into its final location using the two Meta Probe photos as a reference. Once I felt that the spacing looked good, the gluing began and the model began to take shape. Once this was completed the next step was painting it. I live in an apartment so painting is out of the question besides Jim has a special talent for "weathering" a model just right. I love the consistency of all my Space:1999 models. Each one looks as if it's covered in space dust. I must say that the entire project was both fun and frustrating at the same time. There was more waste than planned, but nothing too excessive. If I were to sit down now and build another Meta Probe, I'd have to say it would take one week of continuous work and I'd use all Plastruct materials. As for the cost of constructing my Meta Probe replica, as an estimate I'd say I spent less than $100 (excluding painting). In closing, both my Meta Probe and my Ultra Probe are "flying" side-by-side atop my big screen television, and they look great together. Soon to be joined by many other 1999 models. Current and Past Projects My current project is a giant hanger facility built to scale with the 11-inch Eagle Kit. A total of some 30 Eagles plus hanger cranes and dozens of gantries with be need to complete this project. See some of the completed pieces. If you're considering building your own Meta Probe miniature replica, feel free to use the images on this page as a reference and to contact me if you have any questions or comments. Special thanks must go to Jim Small for all his help in making this project possible. Some of Jim's work is on display in the Space: 1999 Cybrary. His articles include: |
to see a (much) larger view.
|
![]()
This page copyright © 1999 Starship Modeler™. Last updated on 24 February 1999.