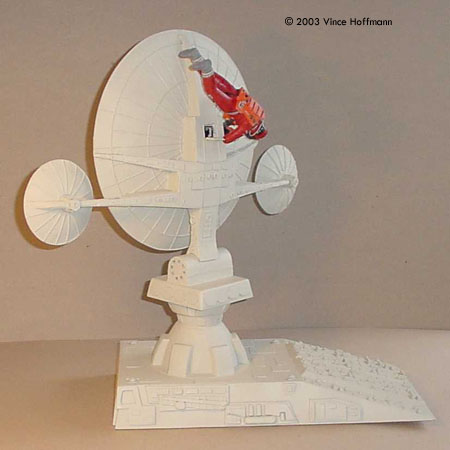
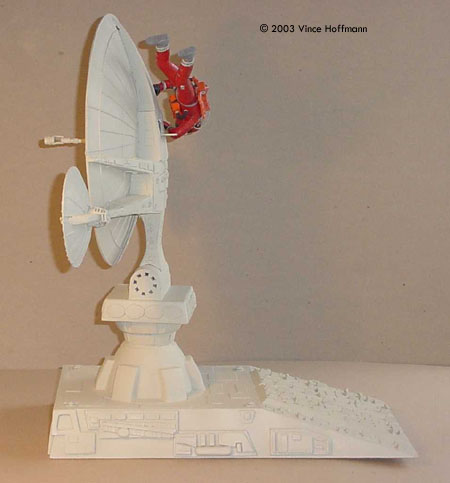
![[Click to enlarge]](vh_ae35_done_rear_s.jpg) |
By Vince Hoffmann - images & text © 2003
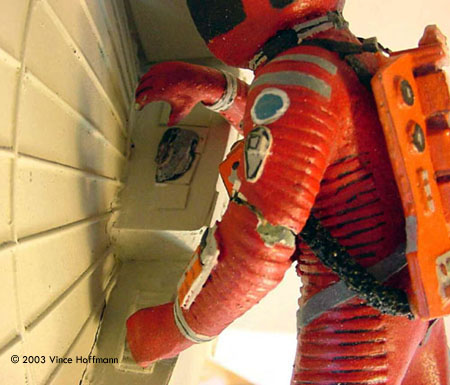
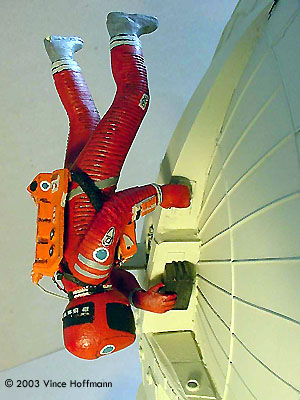
When Dennis Gonzales gave me a call and asked me if I would be interested in rebuilding a rather large model of the AE-35 model, I hesitated wondering what I would be getting myself into. But excited by the opportunity to work on a museum-quality model, I jumped in head-first. I picked up the model from Dennis and I noticed right away why he was so concerned. The model, scratchbuilt by Glenn Ludgate, had been shipped from Australia and had not survived the trip very well. Many small parts were broken or missing and two major assemblies had been completely dismembered. Dave had broken off the back of the model and the support wire through his arm was all that kept his shattered appendage together. Although at first glance the model appeared in bad shape, closer inspection indicated that the repairs would be straightforward and relatively easy. |
|
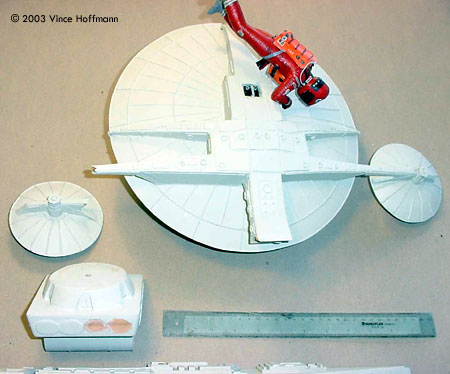
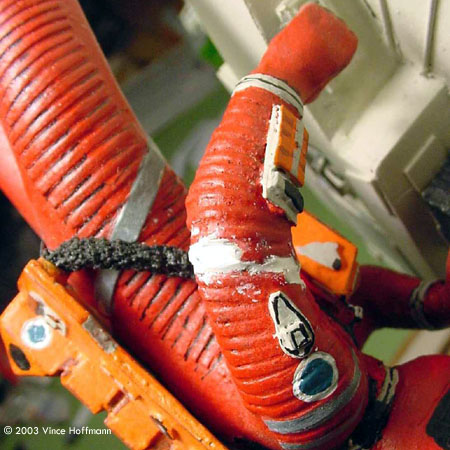
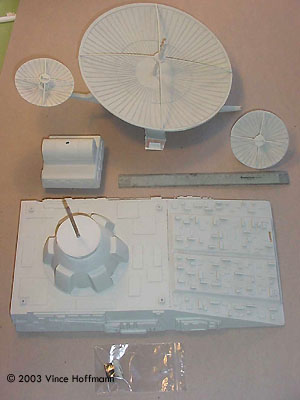
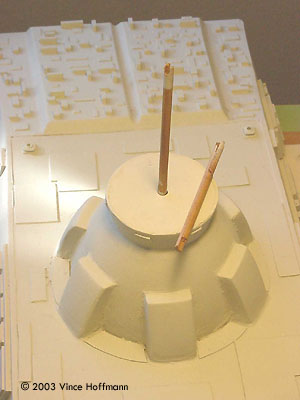
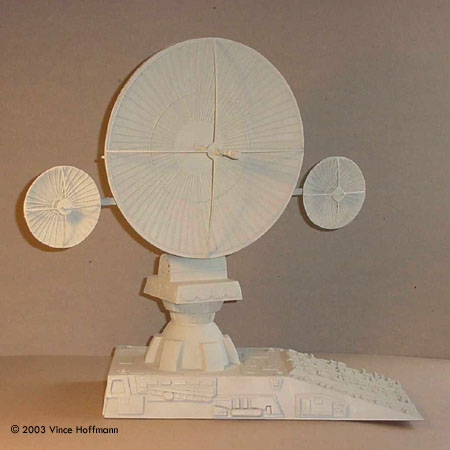
First Step: Repairing Dave Dave was the most fragile part, being made from model parts, cast plaster (?) and bits of plastic. The broken arm parts were deteriorated from rubbing and twisting during shipment. As a result of the loose connection to the back of the AE-35, other edges on Dave had worn or chipped. The broken arm parts were cleaned up, removing all loose material around the break. The two parts of the arm were then aligned properly and a bit of epoxy was applied inside to strengthen the support wire's grip on the pieces. After the epoxy dried, Aves Apoxy Sculpt was applied, packed into the break and sculpted to the proper shape. The folds in the space suit were continued into the putty to create a continuous shape to the patched area. An open hatch with the module Dave is replacing was missing the door and hinges. This piece was replaced with a new laminated plastic part and securely glued in place. The plastic laminations allowed for recessed detail, which could otherwise not be replicated. Fixing The Broken Dish The main assemblies of the dish were made from fiberglass and MDF board with strip plastic details added. The outrigger antennas were held by basswood carved to shape. The outrigger had broken cleanly and could be fitted back together with minimal trouble. The joint was reinforced with a 1 1/2" length of steel rod and secured with super glue. The basswood was sanded and the missing plastic detail bits were then replaced. It was at this point, with Dave secure and the outrigger antenna replaced that the main dish assembly was cleaned up and repaired. Many small bits of plastic detail had come loose or broken off, including the receiver horn and supports. |
| This piece had to be reconstructed new because there were too many missing parts. It was easy to spot and replace the missing pieces as the dish is symmetrical and details are replicated often. | |
|
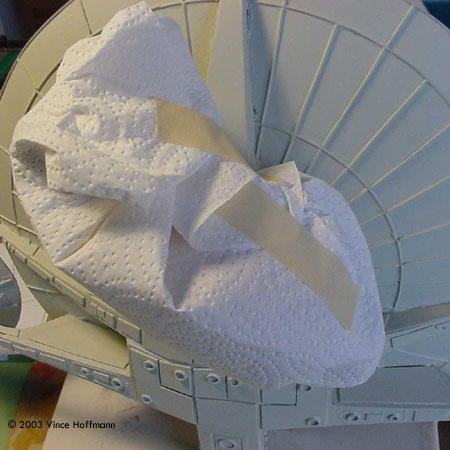
The Base Assembly Constructed of mainly MDF and plastic, this assembly had survived with the least number of bruises. Small plastic bits were replaced, and others re-glued which were ready to break off. The main problem with the base assembly was the connection rod between it and the dish assembly. It was wood and had either been broken before or during shipment. A replacement was fabricated from aluminum rod and tube. The original hole for the rod was drilled out to accept a tube, which would be permanently glued in place. A rod, with a key cut into one end, would be slipped into the tube to allow the dish to rotate. Finishing After the parts had been repaired, plastic details replaced, and weak joints reinforced, all of the assemblies were lightly sanded with steel wool to smooth bumps found in the original paint job, and to prepare the surface for a new coat of paint. Dave was masked from the antenna using a paper towel and masking tape. All of the parts were spray painted with Testors Camoflauge Grey and allowed to dry overnight. Dave had been meticulously hand painted, so simple touch-ups to the chipped and repaired areas were all that was required. The new paint was blended into the old paint, as well as used in other areas to make the patched/painted areas to appear less obvious. A black wash was applied and highlights drybrushed to further hide the patch. At this point, MAG-HOLD decals were created and applied to the proper locations on the side of the hatch into which Dave is seen reaching. The entire model was finally sealed with a coat of Testors Dullcote, and after two days, was delivered back to Dennis.Conclusion I found it quite enlightening being able to work on Glenn Ludgate's model. I observed his construction methods and learned a few things myself. I exchanged several email messages with Glenn and found him to be very forthcoming with his techniques, and a very nice guy to boot! I'm happy to have brought an old model back to life, and return it to a collector who will take good care of it. |
From The Builder The details of construction are as follows: Dave started his life off as a Tamiya motorcycle figure, so the construction is of plastic. He was built between 1995 and 1998. The dishes are made from fibreglass and all trim is Evergreen. The construction of the body and swivel and arms are MDF (compressed board). I picked 1/12 th scale because I could use the Tamiya motorcycle figures. A mate supplied me with plans of Discovery, and I had the AE 35 Unit blown up to the required scale. The basic structure, up to the dishes themselves, was made from MDF. This includes the arms and supports for the dishes. All three dishes were constructed from fibreglass, bogged (puttied), sanded and all the detail made with Evergreen plastic. When building the figure I had moulds made for the front and back packs, as eventually I hope to make a model of the "Open the pod bay doors, Hal" scene . I've started the templates for the EVA pod, but it will be a long term project. The reason for building it, well, TMA #1 is 1/12th scale, and the EVA pod would eventually be that scale, and I'd made a remark to the modelers at Movieworld (on the Aussie Gold Coast) that if I built the dish unit maybe they could built Discovery to go with it! Of course, they didn't! I painted the unit in Camouflage Grey as I wanted it to look slightly off-white when I photographed it, so it didn't give false readings on the camera's light-meter. By painting it in the grey, you can see the hills and valleys of the construction. As to the detail, like on the forward 'wedge', I didn't know what was on it. I don't think anyone did, as you don't see it in the movie. I'm not a professional modeler and I build all my models purely for pleasure. Being a 2001 fan, why not! It's like anything else, you see something you'd like as a model, and you know
That's what scratch building is all about. |
![]()
This page copyright © 2003 Starship Modeler™. Last updated on 10 April 2003.