
By Michael J. Dentzer - images & text © 2002
|
Lunar Models' Discovery, to those that know about it, has brought fear and trepidation to many thinking about building it, or to those who have bought it and upon looking at the contents of the box, promptly closed it again, placing it back on the "to do" pile, hoping to tackle it one day. |
![[]](mj_disc_DONE1.jpg)
|
Well, at least that was what went through my mind after finally deciding I had to have a version of this classic spaceship to place in the display case next to my Moonbus and Orion shuttle.
So I purchased one - two years ago. You can read my initial impressions of the kit in the Preview I did here. Well, after sitting in the "to do" pile for most of the last two years, I finally gathered the courage, as well as the reference material, inspiration from others, time, and attack plan to finally build her. The kit is a relic of the earlier days of the garage kit industry and could use a good overhaul in order to bring it up to the standards being set by todays manufacturers. I've enumerated the many flaws and few high points of the kit in my preview, so I won't go into them here. Let's just get to buildin'! Kleenup The first thing you want to do with this or any resin kit is to give the whole thing a good cleaning in warm water and mild dish detergent. This will remove traces of the greasy mold release agent used in casting the parts. Usually. While this did the job for most of the parts, the good people at Lunar apparently used some other release agent on the multitude of spine modules, that was not washed off with the detergent and water - something I didn't become aware of till AFTER the spine was assembled and ready for primer. More on that little hurdle below. |
|
| |
Laying the Keel The supplied central spine that the kit is built around is an atrocious mess. It's too flimsy to support even its own weight, let alone the masses of resin it would need to support on either end. That and the large sections missing that were an artifact of poor casting and quality control. I replaced it with two sections of 3/8" diam. solid steel rods I took from an old dot matrix printer I'd taken apart. They had threaded ends on them, and I fused them together in the middle by joining two threaded ends in a small 1/2" long piece of 3/8"diam aluminum tube, and sleeving that with an overlapping piece of 1" long thin brass tube, glued in place with superglue. This center point would be hidden by the antennae assembly and surrounding modules, so total neatness wasn't necessary. More aluminum tube would be used on either end to get the correct lengths needed to go through both the engine module and rear hab sphere collar, which would be assembled onto the ends of the finished spine. The total length would be determined by the layout and assembly of the spine modules. In order to mount the spine modules, I had to build all the mounts and couplers. I needed to have a set and consistent pattern to use to make them, so I simply drilled holes into .20 sheet styrene, and used a bolt and 1/4" hex nut as a pattern. Clamped down, cut down, and filed down even with the nut, I could easily produce hexagonal bits that I used to assemble the mounts. All 33 of them. That's 66 plastic hexagons for the mounts, and another 10 for the couplers between the clusters of modules. 76 little plastic hexagonal nuts in all. I built the couplers between each module section by sandwitching a hexagon between two cones I cut from the pointy ends of plastic mechanical pencils I picked up at Walmart cheap for a 4-pack. I needed 22 pencils altogether for the 22 cone sections, 20 complete couplers and a half coupler at either end, and that was the only expense I incurred outside of the purchase of the kit in the first place. Everything else I had laying around already. They were the right size and had appropriate detail on them, and worked out quite well. They at least looked better than the ones from the kit. I did have to drill out the insides a bit to fit them onto the steel rod, but the old dremmel and drill bit made it relatively effortless. The 3 "U" shaped connectors on each coupler are scratched from thin styrene strip. I began at the antennae assembly, (the modules for which are mounted on three 1/4"plastic squares made in the same fashion as the hexagons, (i.e. a 1/4" square nut & bolt) filing the bases of each module flat, supergluing them to the mounts, and moved outward on either side of that towards both ends. The kit's spine actually did come in handy - as a guide to provide a consistent spacing between the module mounts and couplers. Finally, in what seemed like a lifetime, (but was only about a month) the spine was done and ready for primer. |
|
Almost.
I had to deal with that mold release agent that unknown till now was not removed with the sudzy water. I tried again with several standard cleaning agents and still the primer beaded upon application. Well, I dug out a can of automotive carburetor & choke cleaner called Jet Spray Gumout, sprayed the entire spine, and scrubbed it down again with soapy water. That finally did it. It didn't attack the resin (yes, I tested it first) but it really does a number on styrene, melting it like butter (I tested that too, while I was at it). This time, the primer stuck. In fact, I think it adheared to the resin better than I 've ever seen. I'm going to use this stuff to preclean all my resin models in the future. Now on to juicier, and less tedious bits....... Command Sphere The front end of the kit suffered from the same problem as the Hubble Space Telescope before the fix - spherical abberation. (It wasn't round) At least fixing it was a lot simpler and cheaper than our lofty eye in the sky was. A combination of hot water and a hair dryer softened up the resin, which I reshaped, and let cool. Although the part is marginally usable, with some cleanup and a descent finish it looks good enough that scratching another one isn't mandatory. Although I did make a few alterations here and there to make it a bit more similar to the one in the film - 2001, that is, and not the sequel, which it does more resemble. More on that later. First, I cut out the thin resin covering the windows and lined the inside of the windows with a strip of reflective tape. This was a much simpler and effective method of producing a lighted effect than wiring up LEDs or light bulbs. As you can see in the photos, when the light source is directly behind you the tape reflects that light directly back to you, just like the reflectors on the side of the road light up at night from the car headlights.
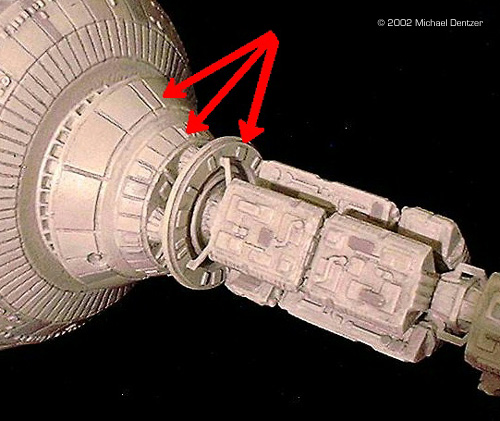
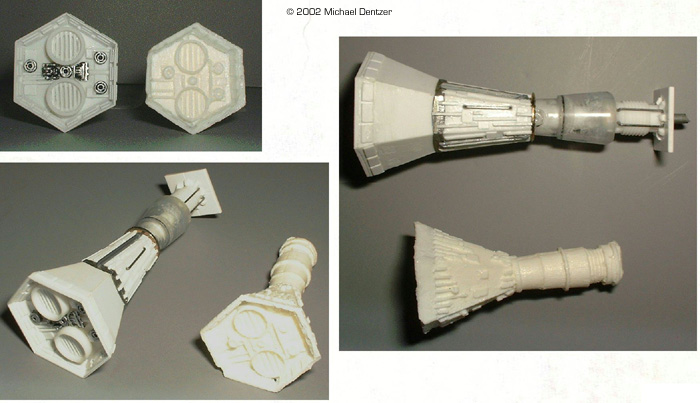
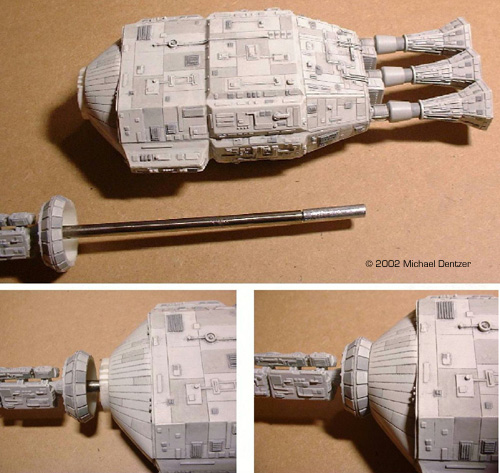
Speaking of the rear collar, I have no idea where the detailing that appears on the back half of the kit part comes from. It's in the form of raised ridges that look terrible, so off they came, and I redetailed it with sheet styrene and bits of styrene strip. I then filed down the 4 nubs on the back and added cone shaped bits to represent the emergency escape engines. I also had to sand flat the front part that connects to the sphere as there was a bit of overpour. Well, better too much resin than not enough, yes? Finally, I drilled a hole through the center of the collar through which the steel rod from the end of the spine would pass and be mounted But before mounting the collar, I needed to build the circular platform it rests on that fits between it and the rest of the spine. The one supplied with the kit is patterned after the one on the Discovery from 2010, and I was building mine to look more like the original. After priming, painting, and weathering, the collar was then epoxied to the spine. Now on to the back end........ ![[]](mj_disc_DONE2.JPG) Reactor Module The real jewel in this kit, and almost worth the price af admission, is the reactor module. Hollow cast with exceptional, crisp detail, and needing minimal cleanup. It was, however, missing a section that fits between the front end and the spine. Not that it was a part missing from the kit, but it had a simplified endcap. The detail on this was nice and aparently correct, so I sawed off the disk at the front end, sanded the remaining front section down, as well as the back of the removed disk, which I would use as the front of the new section I would build. I dug out of the parts box a plastic spool from a scotch tape dispenser which I cut down, shaped and covered in sheet styrene. To the front of this part I glued the disk cut from the front of the reactor module, and through which I drilled a hole for the spine rod to pass. I'm not sure if it matches the one on the 2001 Discovery, but I doubt anyone does, as no detail shots of it appear anywhere in the film or reference photos that I'm aware of. To the front of the reactor module I glued a 1/4" section from the center of the spool of a trashed VCR tape, which plugged perfectly into the scotch tape spool. I then drilled a hole in the center of that for the spine rod to pass through. I added the extra plumbing to the module with the wire supplied with the kit and some staples. Once this was all done, I could cut the section of aliminum tube at the end of the spine rod to the length of the reactor module, at the back of which another hole was drilled to accept the end of the rod, which was now flush with the rear end. This hole and back end of the rod would be hidden once the central engine was afixed. Speaking of the engines.......The Engines One of the bad parts to this mixed bag of quality are the engines. Misshapen, soft in detail, and the wrong size - far too short. In a word, unusable. So, what to do..........scratch build new ones, of course. So that's what I did. In triplicate. Using old pen parts, styrene tubing, two different sized hex nuts (1/4" & 1/2"), sections from drinking straws (the bendy kind), staples, and sheet and strip styrene. Some details at the business ends were liberated from micromachines. Once built, painted, and weathered, I mounted them on the rear of the reactor module, also painted and weathered. I was then ready to mount the whole assembly to the back of the spine. AE35 Unit (Antennae Assembly)
Finishing Touches Before final asembly, all the major parts had been primed with gray primer, base coated with flat white, and panels highlighted with light gray and light ghost gray. A light wash was used to bring out all the detail and panel lines. I then epoxied the command sphere to the collar, alighned, and let sit till dry (30 minutes), and then realized I was done. Finished. I'd completed my Discovery! So, now what? I'll show the wife! "That's nice, dear. What's for supper?". The cat showed even less enthusiasm. So into the display case she went, next to the Orion and moonbus, and an empty stand awaiting the arrival of the Atomic City Aries 1B, also sitting in the "to do" pile. So, how does this kit from Lunar Models compare to the one(s) seen on screen? Lets find out....... A Question of Scale and Size - Does it Measure Up? As is, the Lunar kit has an advertised scale of 1/211 and a built length of 30". If built as is, you arrive at an "actual" length of 527.5 feet. The small work pod that accompanies the kit (which I didn't build as one of the arms was broken) measures 9/16" in height. If scaled at the stated 1/211, the pod would be 9.8 ft tall! Clearly not what we see in either film, and known to have had an actual height of ~6 ft. Scaled at 1/144, the kit's pod comes in with a height of 6.74 ft. Still a bit tall, but close enough. So I have no idea where Lunar's stated scale comes from. In the film 2010, Dr. Floyd states clearly that the ship is 800 feet long. This would produce a pod of around 12 ft tall! Ridiculous. I don't know how or why Peter Hyams arrived at this figure, but it was his film, so there we go.  Clarke, in his novel 2010, remains somewhat consistent with the first book in stating that the Discovery is 100 meters in length which converts to about 328 ft. In his 2001 novel, Clarke gives an approximate length of "nearly 400 feet long" (the novel NEVER states a length of 700 ft. - that's an erroneous caption with the photo of the Discovery seen in early editions of the book, and NOT from Clarke, and is the only source for that length that I'm aware of. But as they say, a picture's worth a thousand words, and a picture WITH a caption, Whoo boy!) and a pressure sphere of 40 ft. in diameter. Lunar's discovery is patterned more after the rebuilt Discovery from 2010. I like the one from the first film better, so I altered the details and scale of my kit to better represent Kubrick & Clarke's Discovery from their respective film and novel. After I'd redone the emergency airlock hatch on the command sphere, I realized it was about the same size as the one on the Aurora Orion in my display case, which is scaled at 1/144. So, let's see, if my Discovery is actually 1/144 scale, at 32" (longer engines, remember) I get an actual length of 384 ft. The command sphere measures 3.5" in diameter, which yeilds an actual diameter of 42 ft. @ 1/144 scale. These dimensions fit quite well with those stated in Clarke's novel, i.e. nearly 400 ft. As you've seen in figure 4 above, the new door I made matches pretty well the one seen on the 2001 filming model, at least in size. So I'm satisfied that my Discovery is 1/144 scale, and looks quite correct sitting next to the Orion in the display case. So that settles it, for me anyway. But how does it actually compare to the originals? Let's see........ A Comparative Review As you see in this composite image the three versions do differ from one another in several respects. I've resized these images so that the command spheres are all the same size in order to compare overall proportions. You can see all 3 do not match up in overall length (actually, if the 2010 Discovery was shown at it's stated lenth it would be over twice as long as the other two). The reactor module on both the Lunar and 2010 versions are about the same size, in relation to the command sphere, and both are larger than their counterpart from 2001. The spine modules on the Lunar kit match better those on the 2001 model, though they are a bit larger, producing an overall lengthening of the spine once it's all together. The spine is much different on the 2010 version, with the modules spaced farther apart. (Note that the antennae is mounted backwards on the 2010 Discovery!) Regardless, though, I'm thoroughly satisfied with the offering from Lunar, and it sure beats having to scratchbuild the entire ship, and until another/better offering comes along, or you build one from scratch, the Lunar kit is still the only game in town (unless you can afford one of Atomic City's studio scale models), and does, with a good deal of effort, build into a satisfying representation. So, If you too have one sitting on your shelf, take it down, blow off the dust, and get to buildin'! |
|
|
|
|
![]()
This page copyright © 2000 Starship Modeler™. Last updated on 28 October 2002.
![[]](mj_disc_DONE3.JPG)
![[]](mj_disc_DONE4.JPG)
![[]](mj_disc_DONE6.JPG)
![[]](mj_disc_DONE7.JPG)
![[]](mj_disc_figure03.JPG)
![[]](mj_disc_figure05.JPG)
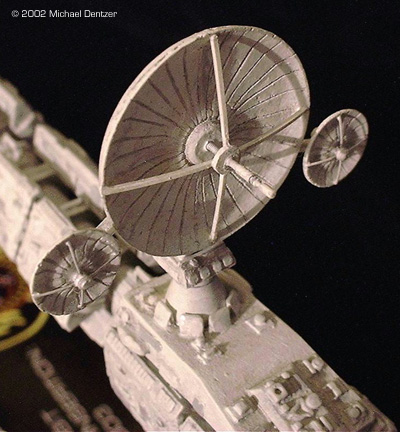
![[Antenna Assy]](mj_disc_figure13.jpg) I gave a good bit of thought to completely scratchbuilding this part, as the main comm dish and two small telemetry dishes aren't really dish shaped. I was going to have to build a new mount as the one supplied was badly deformed and completely inaccurate, but I thought I'd give them a try anyway. They do have some nice scribed detail, and although it should actually be raised rays, look convincing enough at this scale with a good wash. Dressed up in the cross beam supports and a central spike made from an old wind-up wristwatch part,
I gave a good bit of thought to completely scratchbuilding this part, as the main comm dish and two small telemetry dishes aren't really dish shaped. I was going to have to build a new mount as the one supplied was badly deformed and completely inaccurate, but I thought I'd give them a try anyway. They do have some nice scribed detail, and although it should actually be raised rays, look convincing enough at this scale with a good wash. Dressed up in the cross beam supports and a central spike made from an old wind-up wristwatch part, 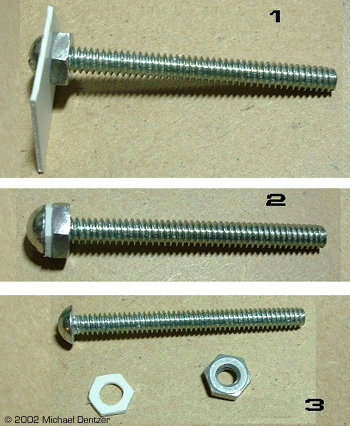