
|
By E. James Small - images & text © 2000
Note: additional information has been appended at the end of this article.
|
![[Click to enlarge]](js_warp_Ssm4.jpg) Initial Impressions This kit was sent to me by a customer in Korea who hired me to build it for him. The kit came well packaged, and parts were well protected. Except for some minor chips on the underside engine bells, no parts were damaged. Flash is very abundant, mostly on the metal parts, but not a serious problem. |
|
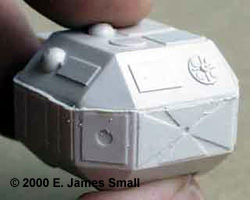
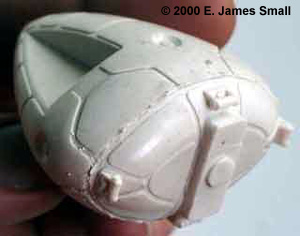
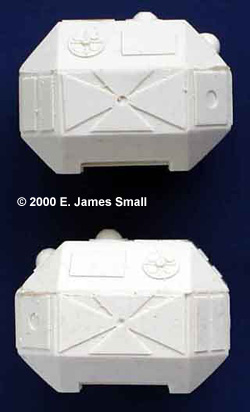
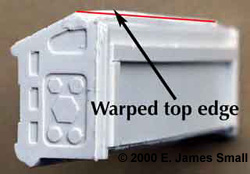
Although there are a few very obvious mold misalignment problems, such as on the shoulder pods and the engine bells, parts casting is adequate with few air-bubbles in areas that show. The parts mastering is absolutely exquisite, especially the paneling on the nosecone, which is a difficult thing to get right. There are a few deviations in proportion that might annoy those who are absolute purists, but overall the kit is quite accurate. The worst inaccuracy is the landing gear "shoulder pods" which has some sloppy angles on the back of the pods making them a bit too short back-to-front. This is very apparent when looking at them in the side profile. The mold misalignment exacerbates the problem. There is no way to fix this without doing intense surgery or rebuilding, so I had to live with this rather annoying flaw. The same goes for a very prominent warp in the top edge of the passenger pod side walls. The problem is in the same place on both sides, indicating the flaw is in the molding or built right into the master itself. Impossible to fix without scratch building, so, again, we must live with it.
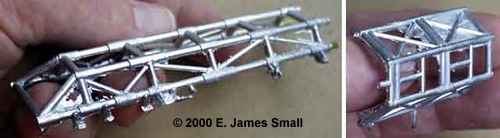
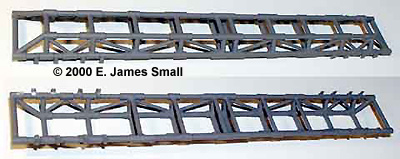
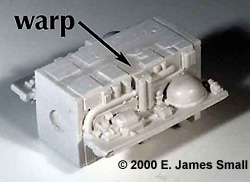
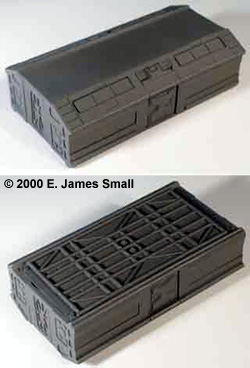
One of the biggest jobs in building this model is cleaning up the tremendous amounts of flash present, especially on the metal parts. Plenty of patience, a Dremel tool and several types of needle files made life easier. Files work well on the very hard resin too. Be prepared to spend many hours cleaning up the parts ready for assembly, as this also familiarizes you with all the bits to prepare you for the steps which follow. After cleanup, the fine tooling of the model becomes more apparent. Assembly Following the instructions, which consist of four pages of basic text and very crude sketches, I assembled the two-piece spine first. I understand that newer kits have a one-piece spine, as it says so in the instructions. So my question is, if the instructions note the improvement in the kit, why did the kit come with the two-piece spine when the improved version was already available? The body frames were next to be built. I took a bit of a detour from the instructions in that I decided to build the metal frames separately, then slide in the detailed "boxes" after the frames were put together. The instructions suggested that the frames should be assembled AROUND the boxes, but the severe warps and sags apparent on the roofs would make that method of assembly difficult to get everything square. In order to slide them into the frames, I had to sand off all the detailing on the top and bottom of these boxes. I later replaced this detailing with some tiny model kit parts.
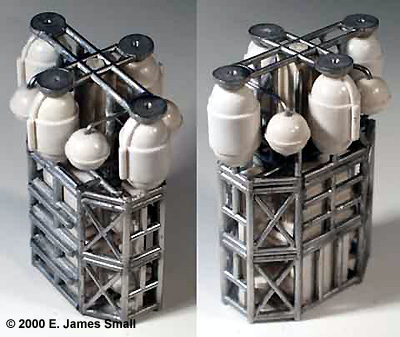
The engine assembly was a pleasant surprise. After cleanup, all parts went together pretty much without a hitch, exactly as shown in the instructions. I was impressed with the engineering of this assembly. Very cleverly done. Again, kudos to the pattern maker. The first thing I did was glue the backs of the pill-shaped engine cylinders to the metal cross which holds them all together. Next, I positioned and glued in place the four balls to the pipe structure. Use caution when bending the metal pieces to accept these balls, so as not to snap them off. This pipe structure was then glued into the back of the Eagle's body frame along with the centre resin pipe. Then the four engines assembly was positioned, glued and the four pieces of metal for the A-frame was glued in place. The four rear engine bells, along with all the other bells on the ship were left off until painting was complete. At this point, I decided to spray the completed frame, passenger pod, cleaned-up nosecone and shoulder pods with grey primer to see if there were any serious imperfections I had missed during construction. Satisfied with the results, a finishing coat of white primer was DUSTED over the model in stages, making sure that some of the grey primer in the nooks and crannies was still allowed to show through a bit. This gives a very nice effect indeed, as it enhances shadows and gives the model some added "depth". This is part of the secret to the weathering of the model too.
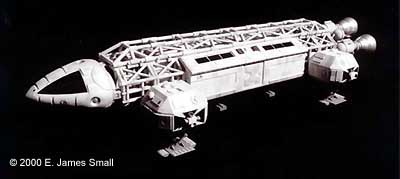
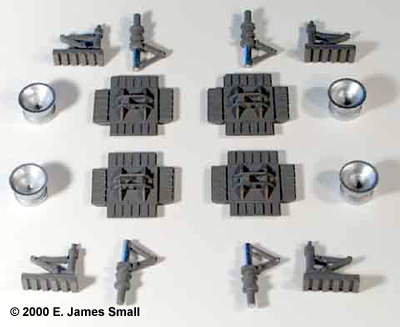
The landing gear shoulder pods (later to be the most troublesome parts of the model) were trimmed, test fitted and glued in place, carefully watching to see that everything was maintained in "true". A fair amount of strategic trimming was necessary. If I were to do the model again, I would replace the far-to-brittle tabs that attach the pods to the body with new ones made from wood or thick styrene sheet. This could be done by drilling out cavities in the pods to accept the new parts and then glueing in less-brittle replacements. The other alternative is to convince the manufacturer to use better quality resin, which is not likely to happen! The oleo struts were glued to the feet and then these were fitted into holes I had drilled into the shoulder pods. The tiny cage-like supports were then glued in place as well as the attitude thrusters and engine bells on the bottom and rear of the model to complete the assembly.  Conclusion Overall, I'm very happy with the results of the model. It looks like an Eagle for sure and the accuracy is far better than any other model of the craft I have yet seen at this scale. It photographs well and, as you can see from the pictures, looks quite realistic. The pattern making is absolutely first-rate, but the manufacturing quality of the kit does not do it any justice. Despite the kit's problems, I still recommend it if you have the money to spend and are an accomplished builder. Hits: Very nicely mastered, fantastic detailing, well proportioned, a more accurate replacement for the ERTL kit at a more expensive but still reasonable price. Misses: Abominable resin quality, annoying mold misalignment problems, very fragile due to weight combined with overly brittle parts. If you dropped the finished model from a quarter of an inch above the table you'd have a lot of repair work to do! Addendum I'm working on the second WARP Eagle kit for another customer now (this one will have the turned engine bells!) and I have learned a few things which I'd like to share. These are, I think, pretty important tips to make the model much stronger and easier to build.... First, do not use superglue to fasten the model together as stated in the destructions. Use epoxy glue or similar adhesive. Use superglue only for glueing walls, roof and floor of the passenger pod together. Glue everything else with epoxy! Immediately before epoxying parts together, sand the mating surfaces with coarse sandpaper and then score with the tip of your exacto knife in a close crosshatched pattern. This helps to give the glue something to hang on to. This is especially necessary when glueing the "greasy" metal parts! Do this just before glueing the parts together to minimize oxidation of the metal, which happens almost instantly and creates an invisible barrier to prevent the glue from sticking well. Replace the weak locator tabs on the shoulder pods with metal rods. Do this by drilling holes into the shoulder pods and also into the center frame box to accept the rods. Using a high tool speed, drill slowly and carefully to avoid fracturing the brittle resin. Best to use a drill press if you have one. Be very accurate in drilling to keep all the pods equal and square. Test-fit this assembly well and then attach them permanently with epoxy after the model is painted. If you use the useless locator tabs provided with the kit, the pods will not support the weight of the finished model and will break. Before gluing on the nosecone, drill holes in the back of the module and the body to accept a metal rod to connect the two. Glue with epoxy. If you do all this, the model will be MUCH stronger than if you build it according to the destructions. |
![]()
This page copyright © 2000 Starship Modeler™. Last updated on 29 September 2000.
 Although the surface finish of the model is very good, the resin quality, however, is absolutely atrocious. By far the worst I've ever seen. Given the many fine brands of resin available for kit casting, I have no idea why the manufacturer would use such horribly substandard material. The stuff is SO unbelievably brittle that it's nearly impossible to build the model without breaking something! In fact, after the model was assembled and being finished, I accidentally broke off the two front shoulder pods by simple handling! I fixed the pods back on with CA. Then, as I was writing this review with the model sitting on the table in front of me, the remaining rear two snapped off while I was typing on my keyboard! No joke or exaggeration... the extreme relative weight of the model combined with the weak resin pod attachment tabs caused them to break away clean at the root! When the gear collapsed, the rear of the model slammed into the table and, because of the inertia due to weight, the lower rear engine bell bent upwards (it's attached to the soft metal) and the engine cylinder ahead of the bell snapped off too. That much damage simply because of poor quality resin! Fortunately CA mended the damage adequately, but the model, because of it's fragility combined with it's extraordinary mass requires extremely delicate handling. I also discovered that, although the resin has no serious air bubbles on the surface, the broken parts revealed that the resin is quite bubble-laden inside. As I write this, I am concerned about shipping the finished model to my overseas customer in one piece! I do not have high hopes that it will arrive unscathed.
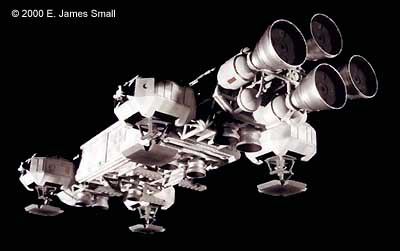 Cleanup begins
 I decided to build the
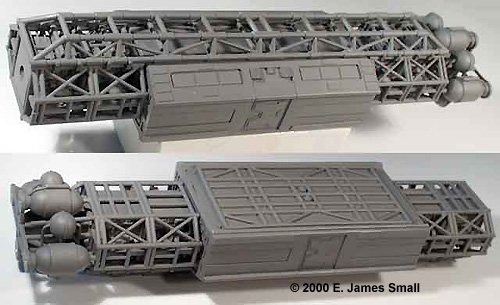
  Next, I glued the frames to the spine. Some tweaking was necessary there to get the parts to fit, but the fitting was better than I'd thought it was going to be, a testament to the individual who planned and mastered the kit. You must have the passenger pod built before doing this operation, so you can leave adequate space for the pod to fit when done. It's a very close fit, as it should be. I glued two heavy-gauge plastic strips in place on the frame to which holes could be drilled to accept screws to mount the passenger pod. For some strange reason, this addition is mentioned but not included in the kit, and is necessary unless you want to glue the passenger pod in place permanently.
 Then, most of the weathering and detailing was done on the model, at least all that which is best done before final assembly.
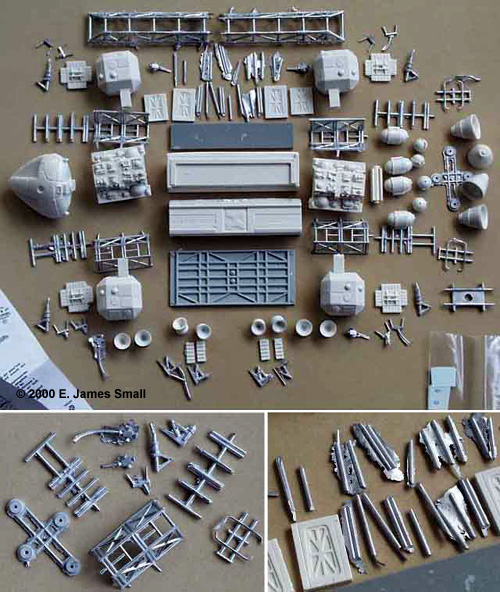